Thursday 10 March 2011

Cheese Risotto


My "Impress You" dish. Don't you have one of those? I use it on everyone - dates, best friends, family, potential in-laws, for bribery, etc. I make this dish (usually with roasted chicken with thyme or rosemary and a nice salad) anytime I want to make absolutely sure that my food will impress and/or please. I like to make it with different cheeses - sometimes because I want to use up what's in my fridge, because a particular cheese is on sale, or because goat cheese makes it such a pretty white! BUT, my absolute favourite cheese to use is Asiago. And not that stuff from your average grocery store (although it will taste fine), it's too expensive and it doesn't have the same depth of flavour, the same nuttiness, or the right level of stink (that good cheese stink is the one I'm referring to here!). Try an Italian market or cheese counter - even Costco!

The first time I made risotto I used a recipe that called for lots of butter. However, since we are adding cheese to this at the end, I don't use any butter. I like to start with extra virgin olive oil instead. If you don't want to use cheese just add a tablespoon or so of butter at the end to get that optimal creaminess that is associated with risotto.

One more thing before the recipe: for rice use Arborio, Vialone Nano, or Carnaroli. Honestly, I have only ever used Arborio and this is mainly because it is easy to find and I think (could be wrong) cheaper than the other two. I have been able to find Scarpone's Arborio at Co-op stores. However, if you can't find these rices you can use short grain white rice. I find it takes a little longer to cook, but it works. You're looking for a high starch content here; it's very important to the final product.

And here's the recipe:

Cheese Risotto
Serves 6-8 as a side dish


  • 900 ml chicken or vegetable broth (one tetra pack or better yet, homemade!)

  • 1 cup Arborio rice (or other as described in post above)

  • 3-4 Tbsp extra virgin olive oil

  • 3 cloves garlic, minced

  • 1 small to medium sized onion, finely chopped (optional)

  • 1/2 cup white wine

  • 1/2 cup to 3/4 cup freshly grated Asiago (you can use more or less depending on your preferences.

  • 2 Tbsp fresh, chopped parsley

Heat broth in a saucepan and keep it at a low simmer on the side - you will need the stock to be hot when you add it to the Arborio rice.

In a large heavy-bottomed skillet heat the olive oil over medium heat (not higher or else it wills smoke!). Sauté the onions for a few minutes, or until the onions are soft, then add the garlic and Arborio rice, stirring to coat with oil. Stirring often, let it cook for about 2 minutes or until you see a white spot in the middle of the grains of rice. Pour in the wine, letting it bubble away until the wine is absorbed.

Add a ladle full of broth and let it cook until it is absorbed, stirring occasionally to ensure it doesn't stick. Add another ladle full of broth and again let it absorb, again stirring to ensure it doesn’t stick. Repeat.

After about 20-25 minutes of cooking time taste the Arborio rice to see if it is al dente (tender, but still slightly firm to the bite). If it not yet al dente, continue cooking, stirring and adding broth until it is. If you run out of broth you may use hot water, but you need not use up all the hot broth if the rice is done.

Remove from heat and stir in the cheese. Sprinkle with the parsely, serve immediately and Enjoy!
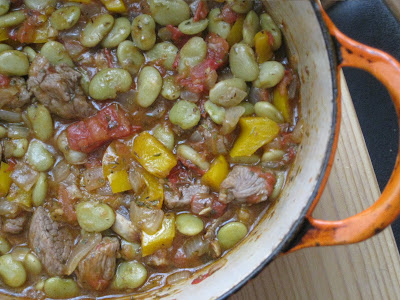
Lamb and Lima Bean Stew

Winter clings on here in Calgary so it is not yet time to relinquish hot and comforting foods! I am still enjoying roasting vegetables and meat but soon it will be time for fresh produce and grilling! For those of you that are still dealing with the snow and slush here's a stew recipe to keep you and your kitchen warm.

Lamb & Lima Bean Stew

Lima beans are a throw back to childhood for me. I have rarely cooked them as an adult and I don't know why. It might be the growing tendency in me to shy away from canned beans with all their wicked sodium, but in reality, I rarely think ahead enough to soak beans and often don't end up eating until 8:00 on weeknights as it is! Is this a reason to not enjoy beans?? Heck no! I plan to eat more Lima beans in the future because they make me happy - canned or dried!

Ingredients:
  • 6 to 8 ounces lamb, leg or shoulder, trimmed and cubed (shoulder is cheaper and works good for stew, it will just require a little more prep time)
  • 1 can lima beans
  • 1 cup butternut squash, diced
  • 2 medium tomatoes, diced (feel free to used canned tomatoes if that's what you have)
  • 1 large onion, diced
  • 3 cloves garlic, diced
  • 2 cups beef or vegetable stock
  • 1 cup mushrooms, diced
  • herbs (oregano, thyme, rosemary) 2 tsp dried, or 2 tbsp fresh
  • flour
  • salt and pepper
  • extra virgin olive oil
Heat about 1 tbsp olive oil in a large heavy bottomed skillet or pan (I used a Le Creuset dish). Lightly dredge the lamb chunks in the flour and add to the hot oil. Depending on the size of your pan, you may have to do this in batches. If you overcrowd the meat it will not brown. Cook on both sides and remove from pan and set aside.

Add a little more oil to the pan and once hot add the onions, squash and mushrooms. Sauté until golden brown. Add the tomatoes, lima beans, stock and garlic. Let simmer until squash is tender and liquid has reduced to a pleasent stew-y consistency.

Flavour with salt and pepper and the herbs, let simmer for another 5-10 minutes. Taste and add more salt and pepper if needed.

Serve with some fresh bread and for wine try a merlot, shiraz/syrah, Chateauneuf de Pape or a dry rosé if you don't like red.

Enjoy!

Tuesday 27 April 2010

Creamy Cheese & Vegetable Flatbread

This recipe came from my cousin's ex-wife - - I really miss her food ;-) This dish in particular was always one of my favourites. Every single time I've made this appetizer it's always been a hit with kids and adults alike. I serve it in any season and you could adjust the toppings based on what's available at the market. I'll share with you my favourite version:

Creamy Cheese & Vegetable Flatbread
  • 2 packages Pillsbury Crescent Rolls
  • 2 eight ounce packages light cream cheese (room temperature)
  • 1 cup miracle whip (if using mayonnaise add a 1/2 tsp of sugar)
  • 2 tsp fresh dill, chopped
  • 1 tsp garlic powder
  • 1 small onion, finely diced (yellow, white, sweet)
  • 1 cup finely diced carrots
  • 1 cup finely cut broccoli (I cut them into tiny florets - check out the picture)
  • 1 cup finely cut cauliflower (cut similar to the broccoli)
  • 1 cup diced green olives
  • 1 cup aged cheddar cheese
Preheat oven to 350º. Line a large, rimmed baking sheet with parchment paper. Open up the crescent rolls and spread out flat on the baking sheet, making sure to join the seams neatly and spread out evenly. Bake for 5-8 mins or until slightly golden. You want to make sure the bottom doesn't burn. Let cool.

Using hand beaters or a mixer, blend the cream cheese, miracle whip, dill, garlic powder and onion until smooth. Set aside.

It is important to finely chop all the toppings or else the bread won't be able to support them. You may find you need more or less of the measurements given.

Using a rubber spatula, evenly spread the cream cheese mixture onto the bread going right to the edges. Next, sprinkle on one topping at a time, ending with the cheese. To finish, take a piece of parchment or waxed paper, lay on top and press down so all the toppings stick into the cream cheese mixture and stay put.

For best results cover in plastic wrap and chill for a couple hours before serving. If you have however made this last minute, no problem, cut it up into small squares and eat it! I take 2 corners of the parchment paper that is lining the baking sheet while the flatbread is still on it and carefully slide it onto a cutting board. This makes it very easy to cut the flatbread evenly and doesn't scratch your pan.

Enjoy!

Monday 11 January 2010

White Wine and Dijon Chicken


After months of preparing the same meals week after week I am determined to be more creative in the kitchen this year! This is something that came together from what I had on hand and I really love it! I hope you do too.

White Wine and Dijon Chicken
For 2
  • 2 chicken breasts, cut into thin strips
  • 1 large white or yellow onion, large dice
  • 3 large garlic cloves, minced
  • 1 portobello mushroom, quartered and sliced (or an equal amount of another mushroom such as button or cremini)
  • 2 Tbsp dijon mustard
  • 1 Tbsp lemon juice
  • 2 Tbsp chopped or 2 tsp dried oregano and/or thyme or tarragon
  • 1/2 cup or more dry white wine
  • salt and pepper
  • 2 Tbsp extra virgin olive oil
Heat olive oil over in a large frying pan over medium heat. Don't use a nonstick pan here as you will be deglazing later. I used a stainless steel pan. Add the chicken and onion and cook until chicken is cooked and slightly browned. Add garlic, dijon, lemon juice, herbs and white wine. Stir and let it bubble and thicken, scraping up the bits off the bottom of the pan with a wooden spoon. Season with salt and pepper to taste.

Enjoy with a glass of the white wine that you used in the chicken. Try a Chardonnay or Sauvignon Blanc.

Enjoy!

Monday 9 November 2009

Warm Brussels Sprouts & Apple Salad


I know it's been awhile since I've posted. School has been so busy that most of my evening are taken up with homework and my cooking hasn't been exemplary. Very sad. But, I will be done in December so we'll see what kind of an excuse I come up with next ;-)

I really like brussels sprouts, or at least when they are sauteed or roasted. If you've never tried them like this, and even if you think you hate them and will never, ever like them, you should try it this way at least once!

Warm Brussels Sprouts and Apple Salad
For 2

  • 1 to 1.5 cups of thinly sliced brussels sprouts (just trim the end and slice)
  • 1 granny smith or other snappy apple, cored, halved and thinly sliced
  • Half a medium onion, any kind you prefer but red would be pretty, thinly sliced
  • 2 Tbsp extra virgin olive oil
  • 1 large clove garlic, diced
  • Juice of one lemon
  • 1 tsp fresh thyme
  • salt and pepper
Squeeze a little lemon on your sliced apples so they don't turn brown.

Heat olive oil in frying pan over medium heat. Add onion and cook until translucent. Add a couple pinches of salt and cook a few minutes more.

Add sliced brussels sprouts and cook another 5 minutes. Add apple, garlic, thyme, pepper and remaining lemon juice and cook another few minutes to incorporate flavours. You want the brussels sprouts to be golden on the edges. For example, the picture above shows a salad that still needs a few more minutes. I took a picture early so I could eat the food before it got cold!

Enjoy!

Sunday 23 August 2009

Salads


Summer is the time to take advantage of all the wonderful and fresh produce available. Not only are seasonal and local fruits and vegetables cheaper than when out of season, they are at their peak in flavour. So make sure to visit your local farmers market.

For a hot, summer night meal try a make-your-own-salad for dinner. This way everybody gets just what they like in their salad and it's nice and light for a summer evening. It's also fun for entertaining.

Make-Your-Own-Salad

  • Lettuce(s)
  • Peppers - bell, sweet, hot
  • Cucumber
  • Tomatoes
  • Berries
  • Cheeses
  • Avocados
  • Cooked chicken, beef, pork, fish, shellfish, beans or tofu
  • Onions - sweet varieties are currently in season
  • Mushrooms
  • Peas
  • Corn - so good right now!
  • Fresh herbs - such as basil, oregano, lavender, thyme, cilantro, parsley, chives, marjoram, or dill
  • Olives
  • Pickles - various
  • Roasted red peppers
  • Croutons
  • etc...
Mustard Vinaigrette
  • 1/2 tsp yellow mustard
  • 1/2 tsp sugar
  • salt and pepper
  • 3 tbsp extra virgin olive oil
  • 1 tbsp white vinegar
Put all in a lidded jar and shake until emulsified.

Serve various salad ingredients in their own bowls along with dressing(s) and pitas or fresh bread. Enjoy!

Sunday 12 July 2009

Stuffed Celery


Here is a great summer appetizer to enjoy while lounging around outside. It's refreshing, has great eye-appeal and should taste great with a Sauvignon Blanc, Rosé, or a Pinot Gris.

Stuffed Celery
  • 1 bunch celery
  • 1 250g container plain cream cheese (full fat or light)
  • 1/4 cup freshly grated Parmigiana, Asiago or Pecorino Romano.
  • 1/3 cup finely chopped, toasted walnuts*
  • 2 tbsp chopped basil
  • 1 tbsp chopped parsley
  • 1 tbsp lemon juice (about the juice of one lemon)
  • salt and pepper
Wash celery and separate ribs; cut into even lengths.

Combine the rest of the ingredients using an electric mixer, or mix well by hand. Using a butter knife, small rubber spatula, or piping bag, fill the celery ribs with the cheese mixture.

Cover celery with plastic wrap or store in container and chill well before serving. Arrange on a platter and serve. Enjoy!

To toast walnuts:

Dry skillet method:
Cook nuts over medium heat, stirring often, until golden brown.

Oven method:
Preheat oven to 350 degrees. Spread nuts on a baking sheet. Bake, stirring occasionally, for 10-15 minutes, or until nuts are golden brown.