Showing posts with label Entrées. Show all posts

Thursday, 10 March 2011

Cheese Risotto


My "Impress You" dish. Don't you have one of those? I use it on everyone - dates, best friends, family, potential in-laws, for bribery, etc. I make this dish (usually with roasted chicken with thyme or rosemary and a nice salad) anytime I want to make absolutely sure that my food will impress and/or please. I like to make it with different cheeses - sometimes because I want to use up what's in my fridge, because a particular cheese is on sale, or because goat cheese makes it such a pretty white! BUT, my absolute favourite cheese to use is Asiago. And not that stuff from your average grocery store (although it will taste fine), it's too expensive and it doesn't have the same depth of flavour, the same nuttiness, or the right level of stink (that good cheese stink is the one I'm referring to here!). Try an Italian market or cheese counter - even Costco!

The first time I made risotto I used a recipe that called for lots of butter. However, since we are adding cheese to this at the end, I don't use any butter. I like to start with extra virgin olive oil instead. If you don't want to use cheese just add a tablespoon or so of butter at the end to get that optimal creaminess that is associated with risotto.

One more thing before the recipe: for rice use Arborio, Vialone Nano, or Carnaroli. Honestly, I have only ever used Arborio and this is mainly because it is easy to find and I think (could be wrong) cheaper than the other two. I have been able to find Scarpone's Arborio at Co-op stores. However, if you can't find these rices you can use short grain white rice. I find it takes a little longer to cook, but it works. You're looking for a high starch content here; it's very important to the final product.

And here's the recipe:

Cheese Risotto
Serves 6-8 as a side dish


  • 900 ml chicken or vegetable broth (one tetra pack or better yet, homemade!)

  • 1 cup Arborio rice (or other as described in post above)

  • 3-4 Tbsp extra virgin olive oil

  • 3 cloves garlic, minced

  • 1 small to medium sized onion, finely chopped (optional)

  • 1/2 cup white wine

  • 1/2 cup to 3/4 cup freshly grated Asiago (you can use more or less depending on your preferences.

  • 2 Tbsp fresh, chopped parsley

Heat broth in a saucepan and keep it at a low simmer on the side - you will need the stock to be hot when you add it to the Arborio rice.

In a large heavy-bottomed skillet heat the olive oil over medium heat (not higher or else it wills smoke!). Sauté the onions for a few minutes, or until the onions are soft, then add the garlic and Arborio rice, stirring to coat with oil. Stirring often, let it cook for about 2 minutes or until you see a white spot in the middle of the grains of rice. Pour in the wine, letting it bubble away until the wine is absorbed.

Add a ladle full of broth and let it cook until it is absorbed, stirring occasionally to ensure it doesn't stick. Add another ladle full of broth and again let it absorb, again stirring to ensure it doesn’t stick. Repeat.

After about 20-25 minutes of cooking time taste the Arborio rice to see if it is al dente (tender, but still slightly firm to the bite). If it not yet al dente, continue cooking, stirring and adding broth until it is. If you run out of broth you may use hot water, but you need not use up all the hot broth if the rice is done.

Remove from heat and stir in the cheese. Sprinkle with the parsely, serve immediately and Enjoy!
Lamb and Lima Bean Stew

Winter clings on here in Calgary so it is not yet time to relinquish hot and comforting foods! I am still enjoying roasting vegetables and meat but soon it will be time for fresh produce and grilling! For those of you that are still dealing with the snow and slush here's a stew recipe to keep you and your kitchen warm.

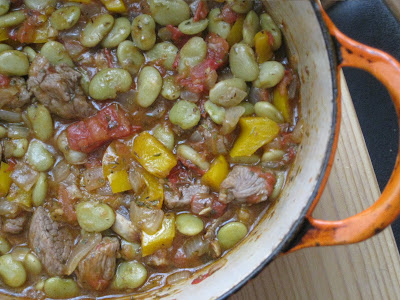
Lamb & Lima Bean Stew

Lima beans are a throw back to childhood for me. I have rarely cooked them as an adult and I don't know why. It might be the growing tendency in me to shy away from canned beans with all their wicked sodium, but in reality, I rarely think ahead enough to soak beans and often don't end up eating until 8:00 on weeknights as it is! Is this a reason to not enjoy beans?? Heck no! I plan to eat more Lima beans in the future because they make me happy - canned or dried!

Ingredients:
  • 6 to 8 ounces lamb, leg or shoulder, trimmed and cubed (shoulder is cheaper and works good for stew, it will just require a little more prep time)
  • 1 can lima beans
  • 1 cup butternut squash, diced
  • 2 medium tomatoes, diced (feel free to used canned tomatoes if that's what you have)
  • 1 large onion, diced
  • 3 cloves garlic, diced
  • 2 cups beef or vegetable stock
  • 1 cup mushrooms, diced
  • herbs (oregano, thyme, rosemary) 2 tsp dried, or 2 tbsp fresh
  • flour
  • salt and pepper
  • extra virgin olive oil
Heat about 1 tbsp olive oil in a large heavy bottomed skillet or pan (I used a Le Creuset dish). Lightly dredge the lamb chunks in the flour and add to the hot oil. Depending on the size of your pan, you may have to do this in batches. If you overcrowd the meat it will not brown. Cook on both sides and remove from pan and set aside.

Add a little more oil to the pan and once hot add the onions, squash and mushrooms. Sauté until golden brown. Add the tomatoes, lima beans, stock and garlic. Let simmer until squash is tender and liquid has reduced to a pleasent stew-y consistency.

Flavour with salt and pepper and the herbs, let simmer for another 5-10 minutes. Taste and add more salt and pepper if needed.

Serve with some fresh bread and for wine try a merlot, shiraz/syrah, Chateauneuf de Pape or a dry rosé if you don't like red.

Enjoy!

Monday, 11 January 2010

White Wine and Dijon Chicken


After months of preparing the same meals week after week I am determined to be more creative in the kitchen this year! This is something that came together from what I had on hand and I really love it! I hope you do too.

White Wine and Dijon Chicken
For 2
  • 2 chicken breasts, cut into thin strips
  • 1 large white or yellow onion, large dice
  • 3 large garlic cloves, minced
  • 1 portobello mushroom, quartered and sliced (or an equal amount of another mushroom such as button or cremini)
  • 2 Tbsp dijon mustard
  • 1 Tbsp lemon juice
  • 2 Tbsp chopped or 2 tsp dried oregano and/or thyme or tarragon
  • 1/2 cup or more dry white wine
  • salt and pepper
  • 2 Tbsp extra virgin olive oil
Heat olive oil over in a large frying pan over medium heat. Don't use a nonstick pan here as you will be deglazing later. I used a stainless steel pan. Add the chicken and onion and cook until chicken is cooked and slightly browned. Add garlic, dijon, lemon juice, herbs and white wine. Stir and let it bubble and thicken, scraping up the bits off the bottom of the pan with a wooden spoon. Season with salt and pepper to taste.

Enjoy with a glass of the white wine that you used in the chicken. Try a Chardonnay or Sauvignon Blanc.

Enjoy!

Saturday, 13 June 2009

Adobo Chicken Pita Pizza


I guess I have been on a bit of a pizza bender lately. So, I console myself with the fact that these are "pita" pizzas and not delivery with thick crust and mounds of cheese. Makes sense, right?

Anyway, this pizza turned out to be SO good that I really wanted to share it. If you're not familiar with Adobo sauce then it's time you got yourself acquainted. Adobo sauce is used in Mexican and Peurto Rican cuisine. It is a spicy, dark red sauce or paste made from ground chiles, spices, herbs and vinegar. It is the sauce that is used to can chipotles, a smoke-dried jalapeno chile. The Adobo sauce is rich and smoky and adds a great depth of flavour to this pizza.

Adobo Chicken Pita Pizza
Makes 2 large pita pizzas

  • 1 chicken breast (I used a cutlet, which was nice as it really picked up on the marinade, more surface area)
  • Adobo sauce
  • 2 large whole wheat pitas
  • 1 cup of pizza sauce
  • 1 onion, diced
  • 1 cup sliced fresh button mushrooms
  • 3/4 cup freshly grated Grana Padano, Asiago, or Parmigiano Reggiano
  • 1/2 cup crumbled Queso Fresco (a crumbly, fresh Mexican cheese), could subsititute with mild goat cheese

Marinate the chicken with the Adobo sauce for a couple hours. My Adobo sauce was more of a paste so I spread it evenly on both sides. Grill the chicken breast or cutlet over medium heat, about 5-7 minutes per side depending on the thickness. Let cool enough to handle and dice.

Caramelize the onions along with the mushrooms. Refer to my posting on Greek Pita Pizza for instructions. Set aside and let cool.

Preheat the oven to 400. Place the pitas on cookie sheets to bake. Spread the pitas with the tomato sauce. Sprinkle on the onions and mushrooms, diced chicken, Grana Padano, and Queso Fresco.

Bake for 13-15 minutes or until cheese and crust are golden.

Enjoy!


Saturday, 18 April 2009

Greek Pita Pizza


There is this Greek store just around the corner from my place - it has the most delicious and good quality ingredients: Greek feta shipped in wooden barrels from Greece, the most flavourful Kalamata olives I have ever tasted, and super fresh pitas. I also picked up some very tasty grape tomatoes from Co-op. What better inspiration for a Greek pizza? With spring fast approaching and the days getting warmer every day (however, it could still snow, a lot, so I hope I just didn't jinx anything!) it's time to start embracing the fresh produce that is becoming available. Seriously, if you have not bought some of the great asparagus that's out you need to - now! The recipe...

Greek Pita Pizza
For one large pita pizza

  • 1 large pita - I used whole wheat
  • pesto (recipe below)
  • brown mushrooms, thinly sliced
  • quartered grape tomatoes or sundried tomatoes
  • spinach
  • sweet onion, caramelized is best*
  • Kalamata olives
  • feta

For the Pesto:
  • 2 cups roughly chopped fresh oregano (could also use basil, thyme or a mix or all three - just be heavier on the oregano or basil if using thyme)
  • half a head of roasted garlic (to roast slice off top of head so all cloves are exposed. Drizzle with extra virgin olive oil and bake at 375 for 15-20 mins, or until golden brown. Let cool).
  • 2 Tbsp of freshly squeezed lime juice
  • 4 Tbsp of extra virgin olive oil
  • sea salt and pepper, to taste
Put first 4 ingredients in food processor and blend until well combined. (just squeeze the roasted garlic in, the cloves will pop right out). Add salt and pepper to taste, and perhaps a little more lime juice - you should be able to taste the lime.

Spread the pesto and on the pita and top with other ingredients. Don't overload the pita or else it will be too heavy and the pita may not crisp up enough on the bottom.

Bake at 350 for 15-20 minutes, or until pita is crispy. Cut up into wedges, serve and enjoy!


*To caramelize onions, check out this website with step-by-step photo instructions. I would cut the onions smaller for our purposes in this recipe. I use extra virgin olive oil too, only up to medium heat, and it works great (remember, that unless you are buying organic canola oil it is all genetically modified (GMOs) and it's not good for you, at all):
http://culinaryarts.about.com/od/vegetables/ss/onionscaram.htm

Tuesday, 18 November 2008

Creamy Chicken and Pumpkin Lasagna


This fall I have been all about the pumpkins, and this was my favourite use: a layer of roasted chicken, kale and mornay sauce, another layer of roasted pumpkin purée and of course, cheese - bocconcini to be exact - all combined into one delicious lasagna. This dish is warm, comforting, and full of colour and flavour.

Creamy Chicken and Pumpkin Lasagna

Here is a list of all the ingredients:
  • Fresh or dried pasta sheets - enough for one large pan. Follow instructions on box if you get the boil first variety.
  • 1 pint of bocconcini, or more if desired, diced - you want a couple cups worth once diced
  • 1 1/2 cups freshly grated Asiago
  • 4 chicken breasts
  • 8-10 one inch slices of sugar pumpkin
  • 1 large onion, cut into wedges
  • 2-3 cloves garlic, peeled
  • 1 large bunch kale, any variety that you prefer
  • salt and pepper
  • extra virgin olive oil
  • Freshly chopped herbs - I used oregano and thyme
  • 1 tsp nutmeg
  • 5 Tbsp butter
  • 4 Tbsp all-purpose flour
  • 4 cups milk - I used 3%

My lasagna had three big layers: creamy chicken, pumpkin purée and bocconcini.
Pumpkin Purée:

  • 8-10 one inch slices of sugar pumpkin
  • 1 large onion, cut into wedges
  • 2-3 cloves garlic, peeled
  • salt and pepper
  • extra virgin olive oil
  • Freshly chopped herbs - I used oregano and thyme
  • 1/2 tsp nutmeg

Arrange pumpkin, onion, and garlic on a pan, drizzle with olive oil, sprinkle with salt and pepper. Bake at 400◦ for about 30 minutes, or until pumpkin is soft and onions and garlic are golden brown. You will have to flip and maybe even remove the garlic and onions before the pumpkin is done to ensure they don't blacken. Let cool. Scoop pumpkin flesh from the rind and purée in food processor with the the onions and garlic, along with any juices, until smooth. Taste and add more salt and pepper if desired along with any chopped herbs and the nutmeg.


Creamy Chicken:

Once you have made each component, the instructions are listed below, mix sauce, chicken and kale together. Try not to drink the sauce - it's pure Heaven.


Sauce:

I used Mario Batali's recipe for Béchamel sauce, making it a mornay sauce simply by adding some grated Asiago - about 1/2 cup. You could go with either. The recipe is here.

Roasted Chicken:


  • 4 chicken breasts
  • Extra virgin olive oil
  • salt and pepper

Place chicken breats on a pan, drizzle with olive oil and sprinkle on some salt and pepper. Roast at 400◦ for 45-50 minutes, or until chicken is cooked through. Let it cool and cut into cubes.

Kale:


  • 1 large bunch of kale, whichever variety you prefer, cut into small pieces with thick stems removed.

Bring a large pot of salted water to a boil. Drop in kale and blanch for about 2-5 minutes, or until kale is somewhat softened - I like mine to retain a bit of crunch. Drain and rinse with cold water.

To Assemble:

Now for the fun part! Most of your work is done by this point. Soon you will be enjoying the lovely aromas emanating from your oven.....


  • A layer of pasta
  • All the creamy chicken mixture
  • A layer of pasta
  • Most of the bocconcini - reserve about a quarter of it for the top
  • A layer of pasta
  • The pumpkin purée
  • A layer of pasta
  • Reserved bocconcini and the Asiago sprinkled on top

Place in a 375◦ oven for about 45 minutes. If top becomes too brown, cover it with foil. Remove from oven and let rest 10 minutes before serving. Cut into slices and enjoy!

Wine Pairing: We enjoyed a lovely Montepulciano d'Abruzzo with this creamy lasagna.

Tuesday, 2 September 2008

Chicken Mirabilis


The inspiration for this dish came from a book that I was reading about Vesuvius' explosion and the fall of Pompeii. In it were many detailed dinners and feasts with Roman decadence and opulence being the main course. Chicken skewers are of course not your typical "fancy" fare; rather it is the ingredients used in the marinade that were the result of my inspiration. Honey, wine, lemon, herbs - all these ingredients, being simple alone, yet rather lavish together, bring my thoughts to the Mediterranean.
The name for this dish is inspired by the Piscina Mirabilis - the pool of miracles I believe is the translation - which is a large cistern that is the terminal outlet of the Serino aqueduct that was built during the Augustan age. I hope the flavours in this chicken are a miracle to your tongue as this feat of engineering was a miracle to the Romans!
Chicken Mirabilis

  • 4 chicken breasts, skin removed and cubed
  • 1/2 cup honey
  • 1/2 cup white wine (try a pinot grigio, trebbiano or sauvignon blanc)
  • juice of 2 lemons
  • 1 cup mixed, chopped fresh herbs (I used oregano, rosemary, lavender and thyme), mint would also be nice
  • salt and pepper

Place the chicken and all marinade ingredients in a large shallow dish so the chicken is well covered in the marinade. Cover and refrigerate for about 2 hours or longer if time permits.

Thread the chicken cubes onto skewers. Heat your grill to medium and grill chicken skewers until golden brown and cooked through, about 5-6 minutes per side.

Wine pairing: serve with the same wine that you used to marinate the chicken with. I suggested a pinot grigio, trebianno or a sauvignon blanc, but if you can get one try a Frascati. This "golden wine" has been drunk in and around Rome for almost 2 thousand years. It comes in either dry or sweet varieties, even as a spumante. Look for a young frascati as this type of wine is not made to age.

If you would rather drink a red you may - try a light red like a dolcetto or a pinot noir.

Enjoy!


Thursday, 7 August 2008

Paneer!


I tasted paneer for the first time about 2 months ago at our friends' Shashi and Anu's house. When I lifted the first bite to my mouth I was expecting the taste and eggy texure of tofu - instead I was met with a creamy texture and mild taste - could it be cheese?? Well, I wasn't too far off. Paneer in an unaged, non-melting cheese that hails from the Indian continent. This protein-rich food is a great subsitute for meat, tofu or beans. You can of course buy it at some supermarkets but once you see how easy this is to make you won't bother. Plus, I think it's important to know what's in your food - and what better way to control what goes into your body than making your food yourself?


Paneer
  • 1 litre whole milk
  • 2-3 tsp white vinegar (you can also use lemon juice, which might require more or citric acid, which will require less)

Pour the milk into a large sauce pan over medium-high heat. Bring to a boil (not a rolling boil mind you, but you want to see it bubbling!), stirring often.

Have a colander ready in the sink lined with a clean tea towel or cheesecloth (*some people keep the whey as they prize its healthful qualities and I've read that some water their plants with it rather than waste it - you be the judge).

Maintaining the milk at a boil, slowly add, one teaspoon at a time, white vinegar. Stir well with every teaspoon that you add until you see the consistency pictured below. What you are seeing is the whey separating from the curds.


Once you reach this point remove the pot from the heat and pour all the contents into the lined colander.

Twist the cloth up to squeeze out the excess whey, all the while running it under cold water as it will be hot. Continue to squeeze and run under cold water until the paneer feels cool through the cloth. Finally, stop running water over the paneer and wring out any excess water.


Open up the cloth and scoop out the crumbly paneer out into a dish. You want to press the paneer so that it will be solid like a soft cheese so that you can cut into cubes or as you please. The lid should fit snugly inside the dish and then be weighted as in the picture below.


Put pressed paneer, weight and all, into the fridge and let set for 2-3 hours.

Turn out the cheese, you may need to gently loosen it from the edges of the bowl with a knife.

I like to serve this in a curry, adding at the last and gently stirring it in to warm through. In this form you need to be gentle with it or it will fall apart. You can also fry it up as it does not melt, creating a pleasing look and adding more to the texture. Add paneer to any dish that you might add cubed chicken or tofu too, and especially to curries.

Enjoy! And remember...this IS easy, just try it!


Friday, 25 April 2008

Quinoa Salad


Quinoa (keen-wa or keen-oa) is a grain that I wish I would have learned about earlier in life. This super food (almost a perfect balance of all eight essential amino acids) was known as the "Mother Grain" to the Incas and has been cultivated for more than 5,000 years! Since my boyfriend is half Peruvian we figure this grain definitely has a place in our diet! But even if you don't share the same heritage as quinoa you should really consider giving it a shot if you've never tried it. Here's a recipe, you won't be disappointed:

Quinoa Salad
  • 1/2 cup quinoa
  • 1/2 cup sliced mini sweet peppers (you could use chopped bell peppers instead)
  • 1/2 cup black beans (canned or already soaked and cooked)
  • juice of 2 limes
  • 1/2 cup kale, chopped and lightly sautéed
  • half an onion, diced and sautéed until translucent
  • 1 tbsp extra virgin olive oil
  • chopped jalapenos or serranos - to taste (optional)

Rinse quinoa well and add to a small saucepan with one cup of water (scant 2:1 water to quinoa - so a little less than double the amount of water to the amount of quinoa). Cover and bring to a boil, reduce heat and let cook until most or all of the water is absorbed and the quinoa pops - it will look like the quinoa grew a little white curly tail - see picture! If you are unsure just give it a taste to see if you like the texture. I have found that cooking quinoa in my rice cooker works really well - if you got one, use it!

Meanwhile, sauté onions first, adding kale when onions are almost done. When the quinoa is finished, drain if necessary and immediately squeeze on the lime juice. Add the rest of the ingredients, stir to combine and serve. This salad is also great cold or reheated. I really like bringing this to work for lunch. The bright colours, varied textures and flavours really appeal to me. The beans make this a hearty and filling dish too. It is just so good for you. Try it today and enjoy!


Monday, 7 April 2008

Gnocchi di Ricotta


Mmmmm...
gnocchi. Besides homemade chicken soup when you are sick or the odd box of KD (c'mon, admit it, most Canadians still love Kraft Dinner, even after they are no longer twelve!) there's not much that' s more comforting than a big bowl of saucy gnocchi. And so versatile! This version is features ricotta and is baked with Asiago and marinara sauce. I've done other versions too, such as herbed gnocchi using basil and oregano with a pesto sauce loaded with garlic. Whatever your mood there's a gnocchi for you!

Gnocchi should be light and airy and not heavy and chewy. Despite this, I don't find it very hard to make, just use a light hand and don't overcook it.


As you can see from the pictures, after the dough is made you roll it into little logs that you then cut "pillows" from. At this point some would roll it down a gnocchi board or down the tines of a fork to give it perfect impressions. Well, instead of these methods I take the end of the handle of a wooden spoon and lay it across, making a little channel with a deep spot in the middle. This little impession will nicely collect a good dollop of sauce on your gnocchi, making each bite a as good as the next. Check out the picture of my "Army of Gnocchi" to see what I mean.


And now, for the recipe:

Gnocchi di Ricotta
Serves 4, with leftovers


  • 1/4 cup durum semolina
  • 3 1/4 cups flour
  • 1 medium yellow potato
  • 2 eggs, lighly beaten
  • 1/4 cup grated Asiago or Parmigiano-Reggiano
  • 1 lb ricotta
  • 1/4 cup Asiago
  • 1/2 tsp olive oil
  • salt and pepper

Bake or boil the potato. When cooked and cooled peel and break up with a fork until you have tiny uniform sized bits. Add this to a medium sized mixing bowl. To this add the flour and stir to combine.

Next, add the lightly beaten eggs, the ricotta, Parmigiano-Reggiano and some salt and pepper. Mix the ingredients, using your hands (no rings!) to form a dough. Transfer to a lightly floured working surface and gently knead for a few minutes, gradually adding the durum semolina, until you form a nice soft dough that is slightly tacky but doesn't stick to your hands. I find that the gnocchi is easier to work with having a bit of the durum semolina added.

Divide dough into 4 peices. Roll each piece into a ball, roll into a log and cut into 1/2 inch pieces. You may find it easier if you divide the dough into more pieces as you will have smaller logs to shape.

Impress the end of a wooden spoon handle into each gnocchi making a little dent.

Preheat oven to 350° (if you are planning on baking the gnocchi). Bring a large pot of water to a boil. Add the tsp of olive oil and the gnocchi. Cook for 2-3 minutes or until gnocchi rises to the surface of the pot. Drain. At this point you can serve the gnocchi with the sauce of your choice or you can mix is up with your sauce, sprinkle with the Asiago and bake, uncovered for 10 minutes.

Serve this with a Dolcetto, Côte-de-Rhones or pinot noir and Enjoy!


Wednesday, 12 March 2008

Wild Rice Risotto

A couple weeks ago we had some friends over for dinner who are from Bulgaria. When they invited us to their house for dinner Slavy made a very delicious and excitingly ethnic array of Bulgarian food for us to sample. When it was their turn to come over for dinner we really wanted to offer some dishes that had a Canadian twist and hopefully something they hadn't had the chance to try before.

I come from a lake town in Northwestern Ontario. There, along the shoreline in certain places, grows wild rice. Given this, I generally have a small store of it in my cupboard. Besides maple syrup, wild rice is very Canadian - and better yet it symbolizes "home" for me - so it was something special and personal I wanted to share with our new friends as they had been so generous when they invited us to their home. Wild rice has a great nutty flavour, is great with poultry and game, and luckily for us, I have the tastier "wild" version (rather than cultivated).

I served the wild rice risotto with a herbed roasted chicken and roasted vegetables - just the thing for a cold Canadian winter dinner! That oven always warms up the kitchen so nicely - as well as warming up my appetite!

So, here is my recipe, it's pretty simple to whip up and I can guarantee that you'll like it. I used a variety of mushrooms that I found at the supermarket - but if you have access to wild mushrooms, I think that would make this dish very special.

Wild Rice Risotto
Serves 6-8 as a side dish

  • 900 ml chicken or vegetable broth (always opt for the low-sodium if you don't have homemade)
  • 1/2 cup wild rice
  • 1 cup Arborio rice (you may use a short or medium-grained white rice if you can't find this)
  • 3-4 Tbsp extra virgin olive oil
  • 2 Tbsp butter
  • 3 cloves garlic, minced
  • 1 small to medium sized onion, finely chopped
  • 2 cups chopped mushrooms (I used brown button, portobello and cremini)
  • 1/2 cup white wine
  • 1/2 cup to 3/4 cup freshly grated Asiago (you can use more or less depending on your preferences. Parmigiano-Reggiano would also be nice, but I adore Asiago and it's cheaper than fresh Parmigiano-Reggiano)
  • 2 Tbsp fresh, chopped parsley
  • salt and pepper

In a medium-sized saucepan cover the wild rice with water by a good inch. You may use broth instead, just remember to buy extra, beyond the 900 ml called for in this recipe. Bring to a boil, reduce the heat and let simmer over low heat for 45-50 minutes, or until some of the rice has "popped" and is slightly soft. It will still be slightly chewy - you do not want to cook it until it is all popped or else it will be watery and mushy. Drain.

Heat stock in a saucepan and keep it at a low simmer on the side - you will need the stock to be hot when you add it to the Arborio rice.

In a large heavy-bottomed skillet heat the olive oil over medium heat. Sauté the onions and mushrooms for a few minutes, or until the onions are soft, then add the garlic. Add the Arborio rice, stirring to coat with oil. Stirring often, let it cook for about 2 minutes or until you see a white spot in the middle of the grains of rice. Pour in the wine, letting it bubble away until the wine is absorbed.

Add a ladle full of broth with some of the wild rice and let it cook until it is absorbed, stirring occasionally to ensure it doesn't stick. Add another ladle full of broth with some wild rice and again let it absorb, again stirring to ensure it doesn’t stick. Repeat.

After about 20 minutes of cooking time taste the Arborio rice to see if it is al dente (tender, but still slightly firm to the bite). Add some salt and pepper. If it not yet al dente, continue cooking, stirring and adding broth until it is. General cooking time is between 25-35 minutes. If you run out of broth you may use hot water, but you need not use up all the hot broth if the rice is done. Just make sure you get all the wild rice in there!

Remove from heat and stir in the butter, cheese and parsely. Serve immediately and Enjoy!


Friday, 14 December 2007

Tourtière

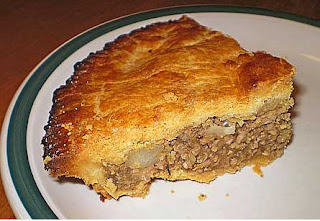
Christmas is a time for enjoying family traditions, whether it be a Christmas party, dressing up for church, or a special dish. My dad's family is Swedish so we always have pickled herring and cil salad (fish salad with beets and eggs). But for those of you who aren't overly fond of fish dishes I'm posting a recipe from my mom's family, the French side, the decadent Tourtière.

The picture here shows a slice of Tourtière, this is a picture I got from the web, maybe my mom or grandma will send me a picture of theirs so I can post that (hint! hint!)

All reference I've found to this dish indicate that this is a French-Canadian dish. I have no Quebeçois ties (that I know of), but somehow this dish made its way to our family dinner table a long time ago. Here is my great-great grandmother's recipe:

French Meat Pie (or, Tourtière):

Mix crust as usual (my family uses the Tenderflake recipe). Instead of using water for moisture use sour milk and soda: to one level cup sour milk use 1 level tsp soda and mix well. This will do for a lot of pie crust, about 4 pork pies.

Filling:
  • 3 lbs leg of pork, lean and ground
  • 2 cups water
  • Salt and pepper to taste
  • 2 large onions, diced

Bring to a boil then add:

  • 2 cups mashed potatoes, mix well and add
  • ½ tsp ground allspice

If too thick add more water. Do not cook much as ingredients will bake in pie. Seal pie well so it won't run over. Roll out dough and put in pie pan, fill with meat filling. Add top crust with small hole in centre. Brush with milk and bake in 400º oven. Bake until brown. Put out to freeze. When warmed put in oven to heat well.

This is my grandma's recipe, basically word for word - it looks like she used to put the pies outside to freeze. My mom told me of this one time that she was at our family cabin making fruit pies. She used to cook over a hot wood stove at the height of summer. In the kitchen of the cabin was a screened in window with ledges where she would put pies to cool. One day the pies smelled so good a bear decided to come down and try to get one! Well, she wouldn't stand for that! She grabbed her mop and started yelling at the bear and pushing the mop into its face! That's one gutsy French lady! I can't remember, but I think she saved her pies. (Mom and grandma, if you have anything to add or correct here, please do!)

Enjoy! And think of my grandma while you do.....she would be happy.

Merry Christmas and a Happy New Year!
XO

Wednesday, 28 November 2007

Garlic Pasta

What stinky breath? Well, that' s exactly what this dish will give you! But, what does that matter when your stomach and tastebuds will be happily soaking up the garlicky goodness of this recipe? Besides, it keeps the vampires away!

Garlic Pasta

Ingredients:


  • One whole head of garlic, or more

  • About ¼ cup olive oil, maybe a bit more depending on how much pasta you are making. (You want to have enough oil in your pan so the garlic can brown, it does not have to be submerged.)

  • Pasta (I like vermicelli or angel hair with this one)

  • Freshly grated parmigiano reggiano

  • Freshly ground black pepper

  • Optional ingredients include: olives, capers, sun dried tomatoes, roasted peppers

Put a pot of water on to boil for the pasta.
Break up your head of garlic and smash each clove with a heavy knife to easily and quickly remove the skin. If the garlic cloves are huge cut them in half (the point is, you want more or less uniform sized pieces of garlic).
Pour your olive oil into a small or medium sized saucepan and add the garlic or any other optional ingredient(s). Cook this on low, and stir every once and a while.
Once you make this a few times everything should be done at the same time. Once the garlic is brown, turn it off! It will taste bitter if overcooked.
Drain the pasta and dump all the olive oil and garlic in and toss (you can do this through a strainer if you think there might be too much oil).
Grate some fresh parmigiano reggiano on top and sprinkle with pepper (fresh if you have it).

This recipe is so simple, but it’s great.


Stink away and Enjoy!

Wednesday, 31 October 2007

Pumpkin Soup - Happy Halloween!


Pumkins are not just for carving.


The only kind of pumkin I ever ate, until recently, was pumpkin pie and it was most likely always made with pumpkin purée from a can. Little did I know that there are a myriad of ways to prepare pumpkin! And, you can even invest in one or two ahead of time as they last weeks if they are not cut. But before you rush out and grab a pumpkin from one of the many bins from which you buy to make Jack-o-Lanterns, read on, and even better, check the link posted at the bottom of this post.


I have looked around and gauged the scene regarding pumpkins. It is really easy to find the type appropriate for Jack-o-Laterns, but less so to find the ones that taste best: sugar pumpkins or as they are sometimes labeled, pie pumpkins. This variety is sweeter and less stringy. I had no luck at Safeway or Coop, but did find them at Sobey's and at farmers markets. My mom told me they carry them at The Place, for anybody living in Fort Frances!


Here is a fabulous and healthy autumn meal that takes the best of the season and transforms it into something delicious! Now, doesn't that make you just a little bit excited about embracing autumn?


Pumpkin Soup


  • 450g or 1 lb pumpkin, chopped into 1 inch cubes

  • ¼ cup butter

  • 1 medium onion, finely chopped

  • 750 ml or 3½ cups chicken broth

  • 2 cups milk

  • Pinch of ground or grated nutmeg

  • Salt and pepper

  • 6 tbsp freshly grated parmesan cheese

Heat the butter in a large saucepan over medium heat. Add the onion and cook for 6-8 minutes, or until onion softens. Stir in the pumpkin and cook 2-3 minutes.

Add the broth and cook for another 15 minutes, or until pumpkin is soft. Remove from heat.

Pour into a blender or food processor and purée. Return liquid to the saucepan. Stir in milk, nutmeg and season with salt and pepper. Let simmer for 10 minutes. Stir in parmesan cheese and serve.


For a great resource on pumpkins check out:


Enjoy!

Friday, 12 October 2007

Squash and Sweet Potato Casserole

Sweet Squash.

Instead of pining over the loss of summer veggies and fruits for another year, welcome autumn by embracing (and eating of course!) what's in season.
It's a wonderful time of the year to have your pick of a variety of squashes. I always love picking one out - so many different shapes, colours and uses. Here's one use that you're sure to enjoy:


Squash and Sweet Potato Bake:

  • 1 large butternut squash
  • 2 medium to large sized sweet potatoes (so, if you use a smaller squash, just reduce the amount of sweet potato - you're aiming for more or less equal quantities of each. Also, if you make a smaller quantity you may want to reduce the amount of onion.)
  • 1 large onion, diced
  • 1 tbsp butter or extra virgin olive oil
  • salt and pepper

Preheat oven to 350°- 375°

Cut the butternut squash in half, lengthwise. Scoop out the seeds and lay the halves on a baking pan. Cut the sweet potatoes in half, lengthwise, lay on baking pan.

Bake squash and sweet potato for a half an hour to 45 minutes, or until tender when pierced with a fork. Remove from oven, let cool until you can handle.

Meanwhile, briefly sauté the diced onion in a pan with butter or olive oil over medium-high heat until translucent.

Scoop out flesh of both squash and sweet potato and mash up with fork or potato masher. Stir in sautéed onions. Spread into a casserole dish and heat at 350° for about half and hour, or until heated through.

Enjoy!

Tuesday, 2 October 2007

Perfect Roast Turkey

First, don't listen to this guy?! LOL

How many times have you invested your time and money into preparing a turkey only to have it turn out dry as a bone and lacking in flavour?

No more will you be plagued by dry white meat! Follow this recipe and be prepared to impress!

The lemons used in this recipe add a nice, subtle lemon flavour to the breast meat, while the herbs add a nice savoury earthiness. This dish is all about aroma and taste, all inside a magnificently crispy skin. If you like to stuff your bird with dressing, omit the lemons and stuff away! If you like the lemons you can always make your dressing on the side.


Perfect Roast Turkey
  • 1 turkey
  • 2 lemons, cut into quarters
  • 2-3 Tbsp freshly chopped or dried herbs (adjust depending on size of bird), such as thyme or rosemary
  • 1½-2 cups chicken broth and/or white wine (pick a wine you enjoy as the flavour of the wine will influence the taste of your bird, and more so the gravy you make from the pan drippings)
  • Sea salt and pepper

Preheat oven to 425°F

Rinse your bird in cold water, taking care to remove any giblets and such from the cavity. Place in roaster pan and pat dry with paper towels.
Stuff cavity with lemons quarters and truss the turkey.
Carefully separate the skin from the breast meat by working your fingers and hands gently(!) underneath the skin.
Rub the herbs, mixed with some sea salt and pepper into the breast meat (this will look and taste so beautiful!)

With a brush (or hands), coat the entire turkey with olive oil.
Place on middle rack of the oven for 20 mins.

Reduce oven to 325°F.

Roast chicken 20 mins. per pound or until the internal temperature reaches at least 165°F and no more than 180°F in the thickest part of the thigh.

3-4 times, depending on length of cooking time, remove turkey from oven, brush again (not with hands this time!) with olive oil and baste with a third or a quarter (depending on length of cooking time) of the wine or chicken stock (I like to use both, the more flavour the better!).
Let turkey rest for 15 mins. before carving.

To make a fabulous sauce simply place roasting pan on the stovetop, on low heat, and deglaze* the pan by scraping up the turkey bits from the bottom of the pan with a wooden spoon. If necessary, add a little cornstarch (dilute this first with a little water or stock to prevent lumping) to thicken it up and more stock to make more gravy. Drizzle over carved and plated turkey.

Now, Enjoy!

*Definition of Deglaze: To remove the remaining buts of sautéed or roasted food from a skillet or pot by adding a liquid and heating. This mixture often becomes the base for a gravy or sauce. http://foodgeeks.com/encyclopedia/44/deglaze/

p.s. Next post I will give you my grandma Noreen's recipe for sweet potato and squash bake. It's very good for you and for your taste buds! And is a perfect side dish for your upcoming Thanksgiving dinner.