Showing posts with label Wine/Food Pairing. Show all posts

Thursday, 10 March 2011

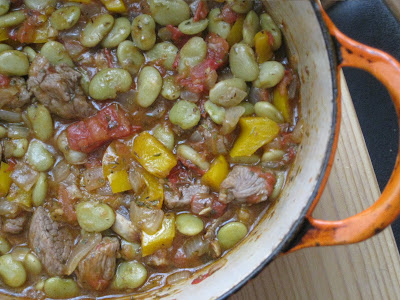
Lamb and Lima Bean Stew

Winter clings on here in Calgary so it is not yet time to relinquish hot and comforting foods! I am still enjoying roasting vegetables and meat but soon it will be time for fresh produce and grilling! For those of you that are still dealing with the snow and slush here's a stew recipe to keep you and your kitchen warm.

Lamb & Lima Bean Stew

Lima beans are a throw back to childhood for me. I have rarely cooked them as an adult and I don't know why. It might be the growing tendency in me to shy away from canned beans with all their wicked sodium, but in reality, I rarely think ahead enough to soak beans and often don't end up eating until 8:00 on weeknights as it is! Is this a reason to not enjoy beans?? Heck no! I plan to eat more Lima beans in the future because they make me happy - canned or dried!

Ingredients:
  • 6 to 8 ounces lamb, leg or shoulder, trimmed and cubed (shoulder is cheaper and works good for stew, it will just require a little more prep time)
  • 1 can lima beans
  • 1 cup butternut squash, diced
  • 2 medium tomatoes, diced (feel free to used canned tomatoes if that's what you have)
  • 1 large onion, diced
  • 3 cloves garlic, diced
  • 2 cups beef or vegetable stock
  • 1 cup mushrooms, diced
  • herbs (oregano, thyme, rosemary) 2 tsp dried, or 2 tbsp fresh
  • flour
  • salt and pepper
  • extra virgin olive oil
Heat about 1 tbsp olive oil in a large heavy bottomed skillet or pan (I used a Le Creuset dish). Lightly dredge the lamb chunks in the flour and add to the hot oil. Depending on the size of your pan, you may have to do this in batches. If you overcrowd the meat it will not brown. Cook on both sides and remove from pan and set aside.

Add a little more oil to the pan and once hot add the onions, squash and mushrooms. Sauté until golden brown. Add the tomatoes, lima beans, stock and garlic. Let simmer until squash is tender and liquid has reduced to a pleasent stew-y consistency.

Flavour with salt and pepper and the herbs, let simmer for another 5-10 minutes. Taste and add more salt and pepper if needed.

Serve with some fresh bread and for wine try a merlot, shiraz/syrah, Chateauneuf de Pape or a dry rosé if you don't like red.

Enjoy!

Monday, 11 January 2010

White Wine and Dijon Chicken


After months of preparing the same meals week after week I am determined to be more creative in the kitchen this year! This is something that came together from what I had on hand and I really love it! I hope you do too.

White Wine and Dijon Chicken
For 2
  • 2 chicken breasts, cut into thin strips
  • 1 large white or yellow onion, large dice
  • 3 large garlic cloves, minced
  • 1 portobello mushroom, quartered and sliced (or an equal amount of another mushroom such as button or cremini)
  • 2 Tbsp dijon mustard
  • 1 Tbsp lemon juice
  • 2 Tbsp chopped or 2 tsp dried oregano and/or thyme or tarragon
  • 1/2 cup or more dry white wine
  • salt and pepper
  • 2 Tbsp extra virgin olive oil
Heat olive oil over in a large frying pan over medium heat. Don't use a nonstick pan here as you will be deglazing later. I used a stainless steel pan. Add the chicken and onion and cook until chicken is cooked and slightly browned. Add garlic, dijon, lemon juice, herbs and white wine. Stir and let it bubble and thicken, scraping up the bits off the bottom of the pan with a wooden spoon. Season with salt and pepper to taste.

Enjoy with a glass of the white wine that you used in the chicken. Try a Chardonnay or Sauvignon Blanc.

Enjoy!

Sunday, 12 July 2009

Stuffed Celery


Here is a great summer appetizer to enjoy while lounging around outside. It's refreshing, has great eye-appeal and should taste great with a Sauvignon Blanc, Rosé, or a Pinot Gris.

Stuffed Celery
  • 1 bunch celery
  • 1 250g container plain cream cheese (full fat or light)
  • 1/4 cup freshly grated Parmigiana, Asiago or Pecorino Romano.
  • 1/3 cup finely chopped, toasted walnuts*
  • 2 tbsp chopped basil
  • 1 tbsp chopped parsley
  • 1 tbsp lemon juice (about the juice of one lemon)
  • salt and pepper
Wash celery and separate ribs; cut into even lengths.

Combine the rest of the ingredients using an electric mixer, or mix well by hand. Using a butter knife, small rubber spatula, or piping bag, fill the celery ribs with the cheese mixture.

Cover celery with plastic wrap or store in container and chill well before serving. Arrange on a platter and serve. Enjoy!

To toast walnuts:

Dry skillet method:
Cook nuts over medium heat, stirring often, until golden brown.

Oven method:
Preheat oven to 350 degrees. Spread nuts on a baking sheet. Bake, stirring occasionally, for 10-15 minutes, or until nuts are golden brown.

Sunday, 7 June 2009

Colle Secco Montepulciano D'Abruzzo DOC


This wine is one of favourites. I love it just on its own. Here is what the vintner has to say about it:

Colour: rich ruby red with purplish highlights and rim of garnet
Bouquet: ripe red fruit with spicy touch of leather, tobacco and liquorice
Taste: full-bodied, with a good structure and well-integrated tannins

Food to serve with: flavoured pasta dishes with tomato sauce, roast meats, game, salami, semi-mature and mature cheeses.

http://www.cantinatollo.it/English/Vini_Abruzzesi.htm

I have also had this with pizza and it was great.

For those living in Calgary I buy this at Co-op liquor stores.

Enjoy!

Tuesday, 18 November 2008

Creamy Chicken and Pumpkin Lasagna


This fall I have been all about the pumpkins, and this was my favourite use: a layer of roasted chicken, kale and mornay sauce, another layer of roasted pumpkin purée and of course, cheese - bocconcini to be exact - all combined into one delicious lasagna. This dish is warm, comforting, and full of colour and flavour.

Creamy Chicken and Pumpkin Lasagna

Here is a list of all the ingredients:
  • Fresh or dried pasta sheets - enough for one large pan. Follow instructions on box if you get the boil first variety.
  • 1 pint of bocconcini, or more if desired, diced - you want a couple cups worth once diced
  • 1 1/2 cups freshly grated Asiago
  • 4 chicken breasts
  • 8-10 one inch slices of sugar pumpkin
  • 1 large onion, cut into wedges
  • 2-3 cloves garlic, peeled
  • 1 large bunch kale, any variety that you prefer
  • salt and pepper
  • extra virgin olive oil
  • Freshly chopped herbs - I used oregano and thyme
  • 1 tsp nutmeg
  • 5 Tbsp butter
  • 4 Tbsp all-purpose flour
  • 4 cups milk - I used 3%

My lasagna had three big layers: creamy chicken, pumpkin purée and bocconcini.
Pumpkin Purée:

  • 8-10 one inch slices of sugar pumpkin
  • 1 large onion, cut into wedges
  • 2-3 cloves garlic, peeled
  • salt and pepper
  • extra virgin olive oil
  • Freshly chopped herbs - I used oregano and thyme
  • 1/2 tsp nutmeg

Arrange pumpkin, onion, and garlic on a pan, drizzle with olive oil, sprinkle with salt and pepper. Bake at 400◦ for about 30 minutes, or until pumpkin is soft and onions and garlic are golden brown. You will have to flip and maybe even remove the garlic and onions before the pumpkin is done to ensure they don't blacken. Let cool. Scoop pumpkin flesh from the rind and purée in food processor with the the onions and garlic, along with any juices, until smooth. Taste and add more salt and pepper if desired along with any chopped herbs and the nutmeg.


Creamy Chicken:

Once you have made each component, the instructions are listed below, mix sauce, chicken and kale together. Try not to drink the sauce - it's pure Heaven.


Sauce:

I used Mario Batali's recipe for Béchamel sauce, making it a mornay sauce simply by adding some grated Asiago - about 1/2 cup. You could go with either. The recipe is here.

Roasted Chicken:


  • 4 chicken breasts
  • Extra virgin olive oil
  • salt and pepper

Place chicken breats on a pan, drizzle with olive oil and sprinkle on some salt and pepper. Roast at 400◦ for 45-50 minutes, or until chicken is cooked through. Let it cool and cut into cubes.

Kale:


  • 1 large bunch of kale, whichever variety you prefer, cut into small pieces with thick stems removed.

Bring a large pot of salted water to a boil. Drop in kale and blanch for about 2-5 minutes, or until kale is somewhat softened - I like mine to retain a bit of crunch. Drain and rinse with cold water.

To Assemble:

Now for the fun part! Most of your work is done by this point. Soon you will be enjoying the lovely aromas emanating from your oven.....


  • A layer of pasta
  • All the creamy chicken mixture
  • A layer of pasta
  • Most of the bocconcini - reserve about a quarter of it for the top
  • A layer of pasta
  • The pumpkin purée
  • A layer of pasta
  • Reserved bocconcini and the Asiago sprinkled on top

Place in a 375◦ oven for about 45 minutes. If top becomes too brown, cover it with foil. Remove from oven and let rest 10 minutes before serving. Cut into slices and enjoy!

Wine Pairing: We enjoyed a lovely Montepulciano d'Abruzzo with this creamy lasagna.

Friday, 10 October 2008

Wine for the Weekend

Having troubles deciding what type of wine to serve with your Thanksgiving meal? Tired of the old white wine with white meat and red wine with red meat rule? Look no further! I have a couple ideas that you may find refreshing:


Pinot Noir

This smooth red will go very well with your bird. It has little tannin and will not overwhelm the taste of your food.


Riesling

A crisp, dry riesling will refresh your palate by cutting through the fatty flavours of a thanksgiving meal. It offers a balance of acidity and sugar that can stand up to stronger flavours.

You're not just serving turkey - think of all the side dishes, or even other meats. Offering both whites and reds to your guests gives them a choice.

Happy Thanksgiving - Enjoy!!

Tuesday, 2 September 2008

Chicken Mirabilis


The inspiration for this dish came from a book that I was reading about Vesuvius' explosion and the fall of Pompeii. In it were many detailed dinners and feasts with Roman decadence and opulence being the main course. Chicken skewers are of course not your typical "fancy" fare; rather it is the ingredients used in the marinade that were the result of my inspiration. Honey, wine, lemon, herbs - all these ingredients, being simple alone, yet rather lavish together, bring my thoughts to the Mediterranean.
The name for this dish is inspired by the Piscina Mirabilis - the pool of miracles I believe is the translation - which is a large cistern that is the terminal outlet of the Serino aqueduct that was built during the Augustan age. I hope the flavours in this chicken are a miracle to your tongue as this feat of engineering was a miracle to the Romans!
Chicken Mirabilis

  • 4 chicken breasts, skin removed and cubed
  • 1/2 cup honey
  • 1/2 cup white wine (try a pinot grigio, trebbiano or sauvignon blanc)
  • juice of 2 lemons
  • 1 cup mixed, chopped fresh herbs (I used oregano, rosemary, lavender and thyme), mint would also be nice
  • salt and pepper

Place the chicken and all marinade ingredients in a large shallow dish so the chicken is well covered in the marinade. Cover and refrigerate for about 2 hours or longer if time permits.

Thread the chicken cubes onto skewers. Heat your grill to medium and grill chicken skewers until golden brown and cooked through, about 5-6 minutes per side.

Wine pairing: serve with the same wine that you used to marinate the chicken with. I suggested a pinot grigio, trebianno or a sauvignon blanc, but if you can get one try a Frascati. This "golden wine" has been drunk in and around Rome for almost 2 thousand years. It comes in either dry or sweet varieties, even as a spumante. Look for a young frascati as this type of wine is not made to age.

If you would rather drink a red you may - try a light red like a dolcetto or a pinot noir.

Enjoy!


Wednesday, 28 May 2008

Deviled Eggs


I love deviled eggs. They are one of those foods I should not be alone with. Like with pizza, my stomach knows no bounds when it comes to how may deviled eggs I could eat! I think that is why they are really called "deviled" eggs!
.
Growing up they frequently made an appearance at family functions. And with springtime rolling in, and with BBQs and outdoor parties to attend, here's a recipe you can wow your friends and family with - it's all in the presentation. Deviled eggs are also an economic dish to make - in fact the toppings might be more expensive than the eggs! So get creative with your egg toppings - wouldn't bacon pieces be good?? Just like eggs and bacon! You could even add a little slice of cherry tomato. For more ideas see the recipe below.

I've always wanted a deviled egg tray (you know, the plates with the egg shaped indentations that hold your deviled eggs just right), so please, if you have one - use it!

Deviled Eggs

Makes 12 eggs


The Eggs

  • 6 hard boiled eggs, peeled and cut lengthwise.
  • ¼ cup mayonnaise or salad dressing (if you use mayo you might want to add a little sugar).
  • ½ teaspoon dry ground mustard, yellow mustard, hot, or whole-grain mustard (pick your preference here keeping in mind that your guests may or may not like hot flavours).
  • Salt and pepper to taste.

Toppings

  • The classic paprika – splurge a little here and get your hands on some good quality paprika, such as Hungarian or Spanish. These can range from delicate to hot, choose whichever one (or two!) that strike(s) your fancy.

  • Chopped olives: try high-quality black olives (never buy “California ripened”, they are picked unripe and then treated with chemicals), kalamata or green. For an extra zip try olives stuffed with jalapenos.

  • Sundried tomatoes, sliced into small slivers.

  • Roasted green chilies or other hot peppers, finely chopped.

  • A variety of chopped herbs such as dill, basil or chives.

  • Crunchy vegetables such as celery, radish or carrot, finely chopped or slivered.

    1. For perfect hard-boiled eggs: Put eggs with enough water to cover them in a saucepan. Cover, bring to a boil, and then turn off heat. Leave the covered saucepan where it is for 12 minutes. Transfer eggs to an ice bath to cool. This will not only quickly cool them, but it will shrink the egg away from the shell to ensure that you get a perfect egg when you peel it!

    2. After the eggs have cooled and are peeled, pop out or gently scoop the egg yolks into a small bowl and mash with a fork or beat with an electric mixer until smooth (this is important if you chose to use a piping bag to fill the eggs). Add the other egg ingredients and mix thoroughly. Taste to see if you are happy with the balance of flavors. Using a small spoon or a piping bag, fill the empty egg whites with the mixture. ***Note: using a piping bag really isn't very hard and the results are well worth your efforts. You can usually find one at your supermarket and it will work fine.

    3. Cover eggs lightly with plastic wrap and refrigerate for up to one day before serving. When ready to serve, arrange eggs on a tray and serve with any of the suggested toppings. You can top them yourself or serve the toppings on the side.
Wine pairing: try a bubbly, a Prosecco, a crisp white wine (ie. Sauvingnon Blanc), or a light and subtle red (ie. Beaujolais). Personally, my favourite pairing would be a dry rosé. Let me know what you think!

Enjoy!

Friday, 2 May 2008

Stuffed Mushrooms


Mmmmmushroooms! This is one of my favourite recipes. It's quick and easy to put together, can be prepared ahead of time and it incorporates many of my favourite ingredients (herbs and wine!!). Plus, everyone loves them. These took me a few tries to get right so I hope you enjoy them as much as I do.

Sarah’s Stuffed Mushrooms
Makes 20

· 1 small onion (yellow, white or sweet), diced
· ½ cup bread crumbs
· ½ cup grated Parmigiano-Reggiano or Asiago cheese
· 100g pancetta, chopped (you can often find this at deli counters, if not use bacon)
· 2 cloves garlic, minced
· 1 tbsp extra virgin olive oil
· 1 tbsp lemon juice (½ to 1 lemon)
· ½ tsp pepper
· 20 large button mushrooms
· 3 tbsp white wine (a Viognier or Sauvignon Blanc is nice)
· 1 tbsp fresh oregano, finely chooped
· 1 tbsp fresh basil, finely chopped

Preheat oven to 425º.

Clean mushrooms by wiping with a damp paper towel. Gently break out entire stem. Reserve ¼ of the stems, trim off the woody ends and dice. Place mushroom caps gills up on a parchment paper lined baking sheet.

Heat olive oil over medium heat in a large frying pan. Briefly sauté the pancetta and onions, for about 3 minutes. Add garlic, sauté another 2 minutes. Remove from heat and stir in remaining ingredients, including reserved diced mushroom stems.

Once well combined stuff each mushroom so they are heaping.

Bake for 10 minutes. Serve immediately.

When it comes time to stuff I generally just use my hands - the ingredients really stick together so you can just mold a little clump of the filling and put it in the mushroom.

I always use Yalumba's Y series Viognier from South Australia for this dish. It's perfect. Enjoy a few stuffed mushrooms with a chilled glass of this great wine and you will have a match made in Heaven. For more information on this wine check it out here, http://www.yalumba.com/vintage.asp?p=154&l=63&v=1965

Enjoy!!


Monday, 7 April 2008

Gnocchi di Ricotta


Mmmmm...
gnocchi. Besides homemade chicken soup when you are sick or the odd box of KD (c'mon, admit it, most Canadians still love Kraft Dinner, even after they are no longer twelve!) there's not much that' s more comforting than a big bowl of saucy gnocchi. And so versatile! This version is features ricotta and is baked with Asiago and marinara sauce. I've done other versions too, such as herbed gnocchi using basil and oregano with a pesto sauce loaded with garlic. Whatever your mood there's a gnocchi for you!

Gnocchi should be light and airy and not heavy and chewy. Despite this, I don't find it very hard to make, just use a light hand and don't overcook it.


As you can see from the pictures, after the dough is made you roll it into little logs that you then cut "pillows" from. At this point some would roll it down a gnocchi board or down the tines of a fork to give it perfect impressions. Well, instead of these methods I take the end of the handle of a wooden spoon and lay it across, making a little channel with a deep spot in the middle. This little impession will nicely collect a good dollop of sauce on your gnocchi, making each bite a as good as the next. Check out the picture of my "Army of Gnocchi" to see what I mean.


And now, for the recipe:

Gnocchi di Ricotta
Serves 4, with leftovers


  • 1/4 cup durum semolina
  • 3 1/4 cups flour
  • 1 medium yellow potato
  • 2 eggs, lighly beaten
  • 1/4 cup grated Asiago or Parmigiano-Reggiano
  • 1 lb ricotta
  • 1/4 cup Asiago
  • 1/2 tsp olive oil
  • salt and pepper

Bake or boil the potato. When cooked and cooled peel and break up with a fork until you have tiny uniform sized bits. Add this to a medium sized mixing bowl. To this add the flour and stir to combine.

Next, add the lightly beaten eggs, the ricotta, Parmigiano-Reggiano and some salt and pepper. Mix the ingredients, using your hands (no rings!) to form a dough. Transfer to a lightly floured working surface and gently knead for a few minutes, gradually adding the durum semolina, until you form a nice soft dough that is slightly tacky but doesn't stick to your hands. I find that the gnocchi is easier to work with having a bit of the durum semolina added.

Divide dough into 4 peices. Roll each piece into a ball, roll into a log and cut into 1/2 inch pieces. You may find it easier if you divide the dough into more pieces as you will have smaller logs to shape.

Impress the end of a wooden spoon handle into each gnocchi making a little dent.

Preheat oven to 350° (if you are planning on baking the gnocchi). Bring a large pot of water to a boil. Add the tsp of olive oil and the gnocchi. Cook for 2-3 minutes or until gnocchi rises to the surface of the pot. Drain. At this point you can serve the gnocchi with the sauce of your choice or you can mix is up with your sauce, sprinkle with the Asiago and bake, uncovered for 10 minutes.

Serve this with a Dolcetto, Côte-de-Rhones or pinot noir and Enjoy!


Wednesday, 29 August 2007

Lemon Garlic Chicken

As requested: a stovetop recipe. A friend of mine teaches English in Korea and requested more stovetop recipes because they don't have ovens in Korea! Or at least, not in her apartment.

This is one of my favourites - it's quick and easy to make, but you would never think it to taste it.......


Lemon Garlic Chicken
Serves 2
  • 2 chicken breasts cut into thin strips
  • 4 garlic cloves, minced
  • 1 medium onion, chopped
  • 2 lemons, use zest of one lemon and use juices of both
  • 2 tbsp extra virgin olive oil
  • 2 tsbp chopped fresh parsely
  • Salt and pepper

When cooking the chicken it is best to use a flat-bottomed, stainless steel, heavy skillet, rather than a non-stick pan, with a wooden spoon to properly deglaze the pan (it will taste better this way!)

Pour olive oil into the pan and heat at medium to medium high (remember, if your olive oil smokes - turn it down! It's too high. Olive oil smokes at 325°). Add onions, let cook for a few minutes, but not until browned. Add chicken, brown. (*note: do not overload the pan, or else the chicken will not brown. Cook in batches if necessary. Divide the onion so there's some in each batch).

Once chicken is browned (if you have done multiple batches you can throw it all in the pan at this point) add the juices of both lemons, the zest, and garlic. Turn the heat down to medium–low and let it bubble. Scrape up (or deglaze) all the brown bits off the bottom of the pan with your wooden spoon (this whole process takes about 3-4 mins).

Remove from heat and add a little salt and pepper and the parsley, stir. You can reserve some zest and use it as a garnish.

And that's it! Pour all the contents of the pan (make SURE you get the juices!) and serve with wedges of lemon, crusty French bread or rice.

Enjoy!!

p.s. This dish is very worthy of being served with a nice wine. Serve with a zippy Sauvignon Blanc.

Monday, 30 July 2007

Redeeming Rosé


For a long time now I have been guilty. Guilty of slandering a type of wine that deserves nothing but reverence! Alas, I know I am not alone in thinking that all wines called "rosé" taste like Ernest & Julio Gallo's White Zinfandel. (For those of you who enjoy this wine, I apologize. But really, you MUST do yourself a favour - just keep reading!) In fact, there is a world of great, dry rosés out there. I've read about "Rosados" from an area of Spain called Navarre which are supposed to be fantastic, but have yet to try one myself.

About 2 weeks ago we were looking at wine (I was looking for the perfect white to go with my stuffed mushrooms - a Viognier from Australia turned out to be perfect) and I was approached by a gentleman working there asking if I needed help. Well, actually, first he stopped to comment on the beer I was holding - Kronenbourg 1664- a really great French beer.
Anyways, we then started talking about a number of wines. After he finished telling me one of my favourite wines tasted like tap water (well la-di-da!) he proceeded to tell Percy and I about rosés. He simply couldn't believe that we had yet to enjoy a rosé in the summer heat, especially when dining al fresco. In fact, he told us a story about this man (a vintner maybe?) that he had spoken with while visiting Bordeaux. Apparently it is practically sacrilege to drink white wine if you are Bordelaise. So, what's the next best thing?? "Le rosé naturellement!" And of course this was all delivered in a great mock French accent. However, that's not the end of the story....he then brought us over to the US section and showed us a rosé that was almost $20 cheaper than usual. Apparently, and this brings this article full circle, in the southern states rosé has a bad rep due to White Zin and so it can be hard to sell rosés at full price. Well, after tasting this wine that suits me just fine:

Kendall-Jackson
Grand Reserve 2006 Rosé Wine
California

Check out your liquor store or wine market for this one. In Calgary I found it at Willowpark. I don't know if it's still on for $11 (rather than $30) but it's worth every penny, either way.

So - hide from the sun no more! When you're armed with a refreshing glass of rosé you can handle the heat. And if you don't believe me, go to Willowpark and ask my wine guy - he'll tell ya! Unless of course you think the Bordelaise don't know their wine.......

Pairing rosé with food is easy according to my wine guy. Since the response "anything" is not good enough for me, I did a search:

Pair rosé with:
  • pizza (yes!)
  • rich patés
  • tomato seafood sauces
  • pork
  • roast turkey (what a nice change for Thanksgiving and Christmas!)
  • tuna, shellfish, shrimp
  • salads
  • vegetarian casseroles

Thanks to nataliemaclean.com for this information. Natalie also has a great new-ish book out: "Red, white, and drunk all over. Check it out, it will make you jealous, and impassioned.


p.s. I'm about to leave for Northwestern Ontario to visit with my family on the lake. I will return August 14th - check back then for more! I think I'll share a favourite family recipe from the cabin.