Friday 14 December 2007

Tourtière

Christmas is a time for enjoying family traditions, whether it be a Christmas party, dressing up for church, or a special dish. My dad's family is Swedish so we always have pickled herring and cil salad (fish salad with beets and eggs). But for those of you who aren't overly fond of fish dishes I'm posting a recipe from my mom's family, the French side, the decadent Tourtière.

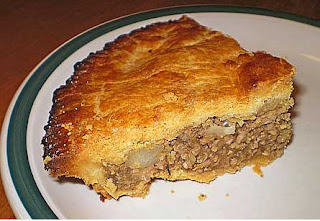
The picture here shows a slice of Tourtière, this is a picture I got from the web, maybe my mom or grandma will send me a picture of theirs so I can post that (hint! hint!)

All reference I've found to this dish indicate that this is a French-Canadian dish. I have no Quebeçois ties (that I know of), but somehow this dish made its way to our family dinner table a long time ago. Here is my great-great grandmother's recipe:

French Meat Pie (or, Tourtière):

Mix crust as usual (my family uses the Tenderflake recipe). Instead of using water for moisture use sour milk and soda: to one level cup sour milk use 1 level tsp soda and mix well. This will do for a lot of pie crust, about 4 pork pies.

Filling:
  • 3 lbs leg of pork, lean and ground
  • 2 cups water
  • Salt and pepper to taste
  • 2 large onions, diced

Bring to a boil then add:

  • 2 cups mashed potatoes, mix well and add
  • ½ tsp ground allspice

If too thick add more water. Do not cook much as ingredients will bake in pie. Seal pie well so it won't run over. Roll out dough and put in pie pan, fill with meat filling. Add top crust with small hole in centre. Brush with milk and bake in 400º oven. Bake until brown. Put out to freeze. When warmed put in oven to heat well.

This is my grandma's recipe, basically word for word - it looks like she used to put the pies outside to freeze. My mom told me of this one time that she was at our family cabin making fruit pies. She used to cook over a hot wood stove at the height of summer. In the kitchen of the cabin was a screened in window with ledges where she would put pies to cool. One day the pies smelled so good a bear decided to come down and try to get one! Well, she wouldn't stand for that! She grabbed her mop and started yelling at the bear and pushing the mop into its face! That's one gutsy French lady! I can't remember, but I think she saved her pies. (Mom and grandma, if you have anything to add or correct here, please do!)

Enjoy! And think of my grandma while you do.....she would be happy.

Merry Christmas and a Happy New Year!
XO

Wednesday 28 November 2007

Garlic Pasta

What stinky breath? Well, that' s exactly what this dish will give you! But, what does that matter when your stomach and tastebuds will be happily soaking up the garlicky goodness of this recipe? Besides, it keeps the vampires away!

Garlic Pasta

Ingredients:


  • One whole head of garlic, or more

  • About ¼ cup olive oil, maybe a bit more depending on how much pasta you are making. (You want to have enough oil in your pan so the garlic can brown, it does not have to be submerged.)

  • Pasta (I like vermicelli or angel hair with this one)

  • Freshly grated parmigiano reggiano

  • Freshly ground black pepper

  • Optional ingredients include: olives, capers, sun dried tomatoes, roasted peppers

Put a pot of water on to boil for the pasta.
Break up your head of garlic and smash each clove with a heavy knife to easily and quickly remove the skin. If the garlic cloves are huge cut them in half (the point is, you want more or less uniform sized pieces of garlic).
Pour your olive oil into a small or medium sized saucepan and add the garlic or any other optional ingredient(s). Cook this on low, and stir every once and a while.
Once you make this a few times everything should be done at the same time. Once the garlic is brown, turn it off! It will taste bitter if overcooked.
Drain the pasta and dump all the olive oil and garlic in and toss (you can do this through a strainer if you think there might be too much oil).
Grate some fresh parmigiano reggiano on top and sprinkle with pepper (fresh if you have it).

This recipe is so simple, but it’s great.


Stink away and Enjoy!

Wednesday 7 November 2007

What's in Season?

Well, for this first time this season I bought tomatoes and, well, they didn't taste so good. I guess it's time to buy canned! However, just because yummy tomatoes are moving out until next year it doesn't mean that there isn't a nice variety of fruit and vegetables that are at their peak! Next time you're at your local grocer or market look for these fantastic fall offerings (and some that are available year-round):


Fruit

Mandarins (November to January)

Pears (August to late November)

Bananas (Year-round)

Grapefruit (Year-round; peak in winter)

Kiwifruit (Year-round; peak in fall and winter)

Lemons (Year-round; peak in winter)

Limes (Year-round; peak in fall)


Veggies

Brussels Sprouts (September to November)

Cabbage (July to November)

Leeks (August to November)

Mushrooms, button (Year-round)

Parsnips (September to November)

Rutabaga (October to December)

Squash, butternut (September to November)


Personally, my favourite is the mandarin orange!! I generally go through couple boxes. And they're a great addition to salads.


Enjoy!

Wednesday 31 October 2007

Pumpkin Soup - Happy Halloween!


Pumkins are not just for carving.


The only kind of pumkin I ever ate, until recently, was pumpkin pie and it was most likely always made with pumpkin purée from a can. Little did I know that there are a myriad of ways to prepare pumpkin! And, you can even invest in one or two ahead of time as they last weeks if they are not cut. But before you rush out and grab a pumpkin from one of the many bins from which you buy to make Jack-o-Lanterns, read on, and even better, check the link posted at the bottom of this post.


I have looked around and gauged the scene regarding pumpkins. It is really easy to find the type appropriate for Jack-o-Laterns, but less so to find the ones that taste best: sugar pumpkins or as they are sometimes labeled, pie pumpkins. This variety is sweeter and less stringy. I had no luck at Safeway or Coop, but did find them at Sobey's and at farmers markets. My mom told me they carry them at The Place, for anybody living in Fort Frances!


Here is a fabulous and healthy autumn meal that takes the best of the season and transforms it into something delicious! Now, doesn't that make you just a little bit excited about embracing autumn?


Pumpkin Soup


  • 450g or 1 lb pumpkin, chopped into 1 inch cubes

  • ¼ cup butter

  • 1 medium onion, finely chopped

  • 750 ml or 3½ cups chicken broth

  • 2 cups milk

  • Pinch of ground or grated nutmeg

  • Salt and pepper

  • 6 tbsp freshly grated parmesan cheese

Heat the butter in a large saucepan over medium heat. Add the onion and cook for 6-8 minutes, or until onion softens. Stir in the pumpkin and cook 2-3 minutes.

Add the broth and cook for another 15 minutes, or until pumpkin is soft. Remove from heat.

Pour into a blender or food processor and purée. Return liquid to the saucepan. Stir in milk, nutmeg and season with salt and pepper. Let simmer for 10 minutes. Stir in parmesan cheese and serve.


For a great resource on pumpkins check out:


Enjoy!

Friday 12 October 2007

Squash and Sweet Potato Casserole

Sweet Squash.

Instead of pining over the loss of summer veggies and fruits for another year, welcome autumn by embracing (and eating of course!) what's in season.
It's a wonderful time of the year to have your pick of a variety of squashes. I always love picking one out - so many different shapes, colours and uses. Here's one use that you're sure to enjoy:


Squash and Sweet Potato Bake:

  • 1 large butternut squash
  • 2 medium to large sized sweet potatoes (so, if you use a smaller squash, just reduce the amount of sweet potato - you're aiming for more or less equal quantities of each. Also, if you make a smaller quantity you may want to reduce the amount of onion.)
  • 1 large onion, diced
  • 1 tbsp butter or extra virgin olive oil
  • salt and pepper

Preheat oven to 350°- 375°

Cut the butternut squash in half, lengthwise. Scoop out the seeds and lay the halves on a baking pan. Cut the sweet potatoes in half, lengthwise, lay on baking pan.

Bake squash and sweet potato for a half an hour to 45 minutes, or until tender when pierced with a fork. Remove from oven, let cool until you can handle.

Meanwhile, briefly sauté the diced onion in a pan with butter or olive oil over medium-high heat until translucent.

Scoop out flesh of both squash and sweet potato and mash up with fork or potato masher. Stir in sautéed onions. Spread into a casserole dish and heat at 350° for about half and hour, or until heated through.

Enjoy!

Tuesday 2 October 2007

Perfect Roast Turkey

First, don't listen to this guy?! LOL

How many times have you invested your time and money into preparing a turkey only to have it turn out dry as a bone and lacking in flavour?

No more will you be plagued by dry white meat! Follow this recipe and be prepared to impress!

The lemons used in this recipe add a nice, subtle lemon flavour to the breast meat, while the herbs add a nice savoury earthiness. This dish is all about aroma and taste, all inside a magnificently crispy skin. If you like to stuff your bird with dressing, omit the lemons and stuff away! If you like the lemons you can always make your dressing on the side.


Perfect Roast Turkey
  • 1 turkey
  • 2 lemons, cut into quarters
  • 2-3 Tbsp freshly chopped or dried herbs (adjust depending on size of bird), such as thyme or rosemary
  • 1½-2 cups chicken broth and/or white wine (pick a wine you enjoy as the flavour of the wine will influence the taste of your bird, and more so the gravy you make from the pan drippings)
  • Sea salt and pepper

Preheat oven to 425°F

Rinse your bird in cold water, taking care to remove any giblets and such from the cavity. Place in roaster pan and pat dry with paper towels.
Stuff cavity with lemons quarters and truss the turkey.
Carefully separate the skin from the breast meat by working your fingers and hands gently(!) underneath the skin.
Rub the herbs, mixed with some sea salt and pepper into the breast meat (this will look and taste so beautiful!)

With a brush (or hands), coat the entire turkey with olive oil.
Place on middle rack of the oven for 20 mins.

Reduce oven to 325°F.

Roast chicken 20 mins. per pound or until the internal temperature reaches at least 165°F and no more than 180°F in the thickest part of the thigh.

3-4 times, depending on length of cooking time, remove turkey from oven, brush again (not with hands this time!) with olive oil and baste with a third or a quarter (depending on length of cooking time) of the wine or chicken stock (I like to use both, the more flavour the better!).
Let turkey rest for 15 mins. before carving.

To make a fabulous sauce simply place roasting pan on the stovetop, on low heat, and deglaze* the pan by scraping up the turkey bits from the bottom of the pan with a wooden spoon. If necessary, add a little cornstarch (dilute this first with a little water or stock to prevent lumping) to thicken it up and more stock to make more gravy. Drizzle over carved and plated turkey.

Now, Enjoy!

*Definition of Deglaze: To remove the remaining buts of sautéed or roasted food from a skillet or pot by adding a liquid and heating. This mixture often becomes the base for a gravy or sauce. http://foodgeeks.com/encyclopedia/44/deglaze/

p.s. Next post I will give you my grandma Noreen's recipe for sweet potato and squash bake. It's very good for you and for your taste buds! And is a perfect side dish for your upcoming Thanksgiving dinner.

Thursday 13 September 2007

Sweet and Sour Meatballs


Well, I don't know what the weather is like where you are, but here in Calgary it has been getting chilly! Know what that means? Time to use the oven again! But whether you're hot or cold, who couldn't use a ball o' meat?!

Sweet and Sour Meatballs
You can use this sauce on other meats, such as pork or chicken. Alternatively, you can make the meatballs with a regular beef gravy and serve with mashed potatoes.

Meatball Ingredients:

  • 1 ½ lbs ground beef
  • 1 med onion, finely diced
  • ¼ cup milk
  • ½ cup bread crumbs
  • Salt and pepper

**if you are making these meatballs to go with beef gravy, try adding a tsp of allspice - my dad calls these “Swedish” meatballs, and they’re really good.**

Sauce Ingredients:

  • 1 large can crushed pineapple
  • 2 cans mandarins (or two fresh mandarins), chopped small
  • ⅓ cup packed brown sugar
  • ⅓ cup ketchup
  • ⅓ cup white vinegar
  • 2 tsp yellow mustard
  • 1 tsp salt
  • ¼ cup cornstarch, with a little water

Preheat oven to 375º.
Combine all meatball ingredients in large bowl, take off your rings, and squish it all together.
Roll out meatballs and place on parchment paper lined baking sheet with sides. Bake for 15-20 minutes, or until browned.

In large saucepan on stovetop over medium-high heat, add all sauce ingredients, except for the cornstarch and water. Let bubble away for a few minutes to let everything melt and meld.
Put the cornstarch into a jar or glass and dissolve it in a little water (to prevent lumps). Add this to the sauce, stir, and watch it thicken. Remove from heat.

Pour meatballs and sauce into a lidded casserole dish (use a cake pan if you don't have one) and replace in oven set at 350º.

Bake, covered (use foil if you have to) for a half an hour. Remove lid and stir gently (don’t bust up those meatballs!) and bake uncovered for another half an hour. Check periodically to make sure it doesn’t need to be stirred again.

Enjoy!

Friday 7 September 2007

The Best Green Beans


My parents have always grown yellow and green beans in their garden. Fresh vegetables from your own garden are always a treat. I miss that garden (sigh), except for that weeding part.

So, what's better than growing your own? Eating of course!

I would like to share a fantastic, and very simple, recipe with you that has kept me eating beans for a long time now:


The Best Beans Ever:


  • 450g or 1 lb fresh green or yellow beans, cleaned and trimmed

  • 1 or 2 garlic cloves, crushed using a mortar and pestle or the back of a heavy knife (alternately you can buy crushed garlic in a jar, use about 3 tsp)

  • 2 tbsp balsamic vinegar

  • 3 tbsp olive oil

  • Salt and pepper

Boil beans until quite soft, about 8 minutes, or until desired tenderness. Drain. Add all other ingredients, toss and serve.

**If beans are unavailable you can use broccoli - adjust the cooking time to 3-5 minutes, you want to retain the colour and some crunch.


FYI:

"Green beans are ready in July and can be enjoyed all summer. Choose bright green beans that are long, slim, and do not have large seed protrusions—this indicates an older, tougher bean. Avoid beans with very noticeable blemishes, or a withered look. Store them in the refrigerator in a clear plastic bag. They will last three to five days. "
From: http://www.foodtv.ca/

Enjoy!

Wednesday 29 August 2007

Lemon Garlic Chicken

As requested: a stovetop recipe. A friend of mine teaches English in Korea and requested more stovetop recipes because they don't have ovens in Korea! Or at least, not in her apartment.

This is one of my favourites - it's quick and easy to make, but you would never think it to taste it.......


Lemon Garlic Chicken
Serves 2
  • 2 chicken breasts cut into thin strips
  • 4 garlic cloves, minced
  • 1 medium onion, chopped
  • 2 lemons, use zest of one lemon and use juices of both
  • 2 tbsp extra virgin olive oil
  • 2 tsbp chopped fresh parsely
  • Salt and pepper

When cooking the chicken it is best to use a flat-bottomed, stainless steel, heavy skillet, rather than a non-stick pan, with a wooden spoon to properly deglaze the pan (it will taste better this way!)

Pour olive oil into the pan and heat at medium to medium high (remember, if your olive oil smokes - turn it down! It's too high. Olive oil smokes at 325°). Add onions, let cook for a few minutes, but not until browned. Add chicken, brown. (*note: do not overload the pan, or else the chicken will not brown. Cook in batches if necessary. Divide the onion so there's some in each batch).

Once chicken is browned (if you have done multiple batches you can throw it all in the pan at this point) add the juices of both lemons, the zest, and garlic. Turn the heat down to medium–low and let it bubble. Scrape up (or deglaze) all the brown bits off the bottom of the pan with your wooden spoon (this whole process takes about 3-4 mins).

Remove from heat and add a little salt and pepper and the parsley, stir. You can reserve some zest and use it as a garnish.

And that's it! Pour all the contents of the pan (make SURE you get the juices!) and serve with wedges of lemon, crusty French bread or rice.

Enjoy!!

p.s. This dish is very worthy of being served with a nice wine. Serve with a zippy Sauvignon Blanc.

Wednesday 22 August 2007

Rosy Mango and Coconut Milk Jello


This time it's elegant....

That's right - more jello! But this time it's virgin - that is, no booze! This jello creation is also much more elegant than shooters, making it a cheap and creative way to serve dessert for a dinner party or a romantic meal.


For this jello dish I used Mango jello and substituted the cup of cold water with a cup of coconut milk. Other variations could include sweetened condensed milk or cream. Use other jellos too - I think strawberry with cream would be divine, garnished with a fresh strawberry.


To jazz this up even more I added a couple drops (yes, only drops, it's potent) of rose water - so this jello really had an Eastern flair! Try to think of other additional flavours, I know not everyone has access to rose water (I got mine at Superstore). You could try almond, vanilla, lemon or orange extract, or orange water, the list goes on.

I picked a little mint from my garden to garnish. If I'd had some fresh mango it would have ended up on top too!


Rosy Mango and Coconut Milk Jello:


  • 1 pkg mango jello

  • 1 cup boiling water

  • 1 cup coconut milk

  • a couple drops of rose water

  • a sprig of mint for garnish

  • And if you have them, clear serving dishes, so your eyes can enjoy the feast as well.

Dissolve jello in one cup of boiling water. Let cool a little, until warm. Add coconut milk and rosewater, stir. Pour into serving dishes and chill until set. And that's it! The mixture of coconut milk and jello separates - but this is part of the allure - the top is mousse like and the bottom is a nice clear jello. Food isn't only about taste, presentation goes a long way.

This is a nice refreshing dessert, not too heavy and just perfect for the last lingering days of summer.

Enjoy!

Wednesday 15 August 2007

Jello Shooters

The Joys of Jello!

Well, I'm back from vacation and as promised I'm going to share a cabin favourite: jello shooters! These are a family favourite for parties - they really pack a punch! We have these so often that my dad said he can't even remember the last time he's had regular jello! Indeed, he even made a "jello shooter tree" which my parents decorate differently depending on the theme or holiday. He cut out 5 circles of styrofoam, each a little smaller than the first, the largest of which serves as the base, the smallest circle being the top. Then, depending on the occasion, decorate the tree!

However, the creativity doesn't stop there; just think about the myriad of possibilities there are when it comes to jello flavours and booze. Here's how you do it:

Jello Shooters
  • 1 pkg jello
  • 1/2 cup booze
  • 1/2 cup cold water
  • 1 cup boiling water

As per packet instructions, dissolve the jello crystals in the cup of boiling water. Next, add your booze and cold water. My mom is able to get paper medicine cups from a general supply store. I have not been able to find these (well, I haven't tried that hard!) so I use dixie cups. Next, pour your jello into the cups and chill until set.

Experiment with different flavour combinations, here are a few ideas: vodka & orange, white rum & strawberry, tequila & lime, melon liqueur & mango, malibu rum & pineapple, the list goes on.

If you have the inclination to be fancy, do it! Jazz up your
jello by piping some whipping cream on the top of each
shooter. My favourite idea is to make orange, lime or
lemon jello shooter wedges. Simply slice fruit in half,
spoon out the flesh, and pour in your prepared jello. Chill
until firmly set and cut into wedges - 3 from an orange and
2 if using a lemon or lime.

Try this recipe next time you are hosting a party, your guests will be sure to enjoy!

Monday 30 July 2007

Redeeming Rosé


For a long time now I have been guilty. Guilty of slandering a type of wine that deserves nothing but reverence! Alas, I know I am not alone in thinking that all wines called "rosé" taste like Ernest & Julio Gallo's White Zinfandel. (For those of you who enjoy this wine, I apologize. But really, you MUST do yourself a favour - just keep reading!) In fact, there is a world of great, dry rosés out there. I've read about "Rosados" from an area of Spain called Navarre which are supposed to be fantastic, but have yet to try one myself.

About 2 weeks ago we were looking at wine (I was looking for the perfect white to go with my stuffed mushrooms - a Viognier from Australia turned out to be perfect) and I was approached by a gentleman working there asking if I needed help. Well, actually, first he stopped to comment on the beer I was holding - Kronenbourg 1664- a really great French beer.
Anyways, we then started talking about a number of wines. After he finished telling me one of my favourite wines tasted like tap water (well la-di-da!) he proceeded to tell Percy and I about rosés. He simply couldn't believe that we had yet to enjoy a rosé in the summer heat, especially when dining al fresco. In fact, he told us a story about this man (a vintner maybe?) that he had spoken with while visiting Bordeaux. Apparently it is practically sacrilege to drink white wine if you are Bordelaise. So, what's the next best thing?? "Le rosé naturellement!" And of course this was all delivered in a great mock French accent. However, that's not the end of the story....he then brought us over to the US section and showed us a rosé that was almost $20 cheaper than usual. Apparently, and this brings this article full circle, in the southern states rosé has a bad rep due to White Zin and so it can be hard to sell rosés at full price. Well, after tasting this wine that suits me just fine:

Kendall-Jackson
Grand Reserve 2006 Rosé Wine
California

Check out your liquor store or wine market for this one. In Calgary I found it at Willowpark. I don't know if it's still on for $11 (rather than $30) but it's worth every penny, either way.

So - hide from the sun no more! When you're armed with a refreshing glass of rosé you can handle the heat. And if you don't believe me, go to Willowpark and ask my wine guy - he'll tell ya! Unless of course you think the Bordelaise don't know their wine.......

Pairing rosé with food is easy according to my wine guy. Since the response "anything" is not good enough for me, I did a search:

Pair rosé with:
  • pizza (yes!)
  • rich patés
  • tomato seafood sauces
  • pork
  • roast turkey (what a nice change for Thanksgiving and Christmas!)
  • tuna, shellfish, shrimp
  • salads
  • vegetarian casseroles

Thanks to nataliemaclean.com for this information. Natalie also has a great new-ish book out: "Red, white, and drunk all over. Check it out, it will make you jealous, and impassioned.


p.s. I'm about to leave for Northwestern Ontario to visit with my family on the lake. I will return August 14th - check back then for more! I think I'll share a favourite family recipe from the cabin.

Friday 27 July 2007

Soba Veggie Salad with Sesame Oil Dressing


I love salads, but I get bored fast eating the same thing (except with pizza!). Day after day of regular tossed salads just isn't exciting enough. Alongside these meatballs, which are pork meatballs with an almond sauce (drool) is a soba noodle and veggie salad with a tasty sesame dressing. I like making different salads as it is a great opportunity to clean out your crisper. With all the fantastic fresh produce available right now, what better time then to get creative with veggies?

Soba Veggie Salad with Sesame oil dressing:
(for 2)

Any of the soba noodles I've ever bought come in packages that contain 4 individually wrapped servings each good for 2 people in this recipe, which makes it easy. Soba noodles are Japanese noodles made of buckwheat flour. If you can't get soba noodles, you can use vermicelli, it will taste great.

  • soba noodles (or vermicelli)
  • half an english cumcumber, chopped
  • 1/2 cup edamame (fresh soy beans. Peas or beans would be good too)
  • 1 red pepper, chopped
  • a few green onions, chopped

Cook the noodles according to the directions on the package. Rinse under cold water until cool. Add these to a salad bowl with all the chopped veggies.

To make the dressing, add to a lidded jar:

  • 1/2 tsp sesame oil, or to taste (be careful with this, it's very potent!)
  • 2 tbsp olive oil
  • 1-2 tsp sugar
  • 1 tbsp rice vinegar (you could use white wine vinegar instead)
  • the juice of one lemon
  • salt and pepper
  • 1/2 tsp red chili paste, or 1 small chopped chile (optional)

Shake the dressing in the jar until all the sugar has dissolved and it becomes emulsified. Toss the dressing with the salad and eat! Hope you enjoy this.

Check out this link to learn more about Soba noodles: http://en.wikipedia.org/wiki/Soba

Tuesday 17 July 2007

Cooking al fresco - Pizza


We were so lucky this year to find the most beautiful
camping site on Kootenay Lake. The grounds were
crawling with flowers, herbs, vegetables, and dogs (the dogs have nothing to do with cooking, no worries, it was just
notable). The oregano pictured here was growing mere feet from our tent just begging to be put to good use.
What better than a twist on a classic - pesto - with oregano
instead of basil.


We decided to use the pesto as a base for our pizza, since
we love making it on the grill. See our ingredients
pictured on the right. Using good quality extra virgin olive oil was key in this dish. I used some olive oil to finish by drizzling it all over when the pizza was cooked.


Applying the pesto to the crust, yum.
We used oregano, olive oil, garlic, a little lime juice, salt and pepper.


And.....the finished product! Growing alongside the oregano were chives in blossom. We used these edible flowers to decorate the pizza, very pretty and very yummy.
Thank you to Percy for taking these great pictures!
You can check out these
sites to see more edible flowers:
I think pansies in a salad would be beautiful! I also saw on one of these links the idea to freeze flowers within ice cubes - what an elegant drink that would make.

Monday 16 July 2007

Portobello Mushroom Burgers

Yum...Sweet Onions! Beginning in May, these fantastic onions from Georgia appear in grocery stores. I believe the usual season is from May to June but just yesterday I found some at Co-op and promptly loaded a bunch of them into my cart. If you haven't tried these onions, you really must, they are sweet, juicy and crunchy and just another great piece of produce to look forward to in the summer. My mom looks for these in her grocery store every summer - as a kid I didn't understand the excitement associated with this yellow, bulbous vegetable, but now I get it. I like using them in dishes that feature raw onions - try them in a favourite salsa or chutney recipe, you don't need to worry about them overpowering your dish. They're also good sliced up raw and piled onto a cheeseburger - yum!

Here's a recipe you could use them in, although they take a little heat in this one:

Portobello Mushroom Burgers
For 2
2 portobello mushrooms
3 tbsp olive oil (I always use cold-pressed extra virgin for everything (because I LOVE it), it's up to you)
1 tbsp diced garlic
3 tbsp red balsamic vinegar
salt and pepper

Toppings:
Thinly sliced Vidalia onions
Thinly sliced cheese, whatever you like, I always use something stinky

Marinate the mushrooms in the above ingredients for one hour.
On a hot grill place mushrooms gills down and grill for about 6 minutes. Flip the mushrooms and place some onions and cheese on the gills. Grill for another 6 minutes.

These make great burgers! They're nice and meaty, and very filling. Percy (my boyfriend) who always wants meat, was even happy and full after eating these. Serve on a toasted bun with your favourite condiments. I like mayo, avacado, BBQ sauce, even mustard and ketchup. If you want to be gourmet, you could make lemon aioli, or your own spiced up mayo creation.

To learn more about vidalia onions check out: http://www.vidaliaonion.org/

p.s. I do have some outdoor cooking pictures from camping, I meant to share these with you right after we got back from camping but I'm having a hard time getting those pictures to load up! Bear with me, we should be able to get them up yet!

Tuesday 26 June 2007

From Camp Cookin' to Wine

Part 1

Tomorrow my boyfriend Percy and I are heading out to Kootenay lake to go camping!! I can't wait! Even on vacation I still love to cook and see tenting as no excuse to stick to hotdogs on sticks (even though they are soo good....drool, Homer Simpson-styles). We have a propane powered portable Coleman grill that we bring with us - it has a flat side and a grill side. With this you can do so much! I also bring along a pot to heat water for coffee (and dishes), using a coffee press, or French press - which, by the way, makes the best coffee! Beyond the barbequeing basics, such as burgers, steaks and other grilled meats, here is a list of things we've used the grill for in the past, that are well, tent-tantilizing!!

  • skewer/kabobs - including meat, poultry, veggies.
  • eggs and bacon, sausages
  • toast
  • fish - straight on the grill, or in a foil packet
  • corn on the cob
  • put a pot on the flat side of the grill, and make anything you can boil or cook in a pot
  • garlic bread
  • foil packages of potatoes, carrots, onions, etc
  • asparagus - straight on the grill
  • fried mushroom and onions
  • quesadillas
  • and my favourite, Pizza:

  • buy pre-made pizza crusts, or use pitas
  • buy pre-shredded cheese (unless you are super organized and brought a shredder, shred your own!)
  • buy pizza sauce from a can or jar
  • go to a deli and get shaved dried salami, ham, pepperoni, whatever you like
  • any veggies you like
  • set the grill as low as it can go
  • assemble your pizza and place it on the grill
  • tent some foil over top to help warm up the toppings quicker and to melt the cheese - you don't want to burn the bottom of your pizza
  • Enjoy!

And I had to share this recipe I found on thecampingsource.com, it's so rad:

Heat a flat rock in the fire, fry 2 slices of bacon on the rock to grease up the rock, then dip a slice of bread in egg and lay it across the crispy bacon ( the bacon should bake onto that side). Brown both sides of the toast. Once toasty lay the bacon side back down on the hot rock, using your knife cut out a small hole in the middle of the toasted bread to form a well. Try not to slice through the bacon, in this well break an egg into it and fry the egg till you like it done, butter the top and add salt n pepper. Serve with warm maple syrup eat it right off the rock no messy plates to clean up. Enjoy adding your own variations.

Isn't that cool? There must be a Brownie badge for that one! I also like the idea of wrapping potatoes in foil and cooking them in the embers of your camp fire.

Please share your favourite camping recipes or ideas. I'll be back on July 8th - till then!

Part 2

Ah, the Okanagan. For any of you who have not had the fabulous opportunity to go visit wineries in the Okanagan, let me tell you - it is great! When we camp on Kootenay we always take one day to go and buy some wine. Everyone there is so incredibly friendly and at almost every turn off there is another winery: http://www.discoverwines.com/wine-map.php - just look at that map!

The Okanagan is nice and hot in the summer, with great swimming, nice people, tonnes of fresh (and cheap!) local fruits and veggies, and of course copious amounts of wine! (My friend Keelin tells me there's a great Perogie place in Kelowna called Cecil's - who doesn't like pedahe?? We also visited a fantastic Greek restaurant in Penticton once called Theo's).

I want to share with you our favourite wineries (so far at least):

  • Hester Creek - Trebbiano -- a really special wine. Last year we went to the winery and they were sold out! I swear I almost started crying. However, we went to this really good Indian restaurant in Oliver and they had the Trebbiano on the menu. I asked if they had any bottles left, and they said yes, we have a few. I then asked if it would be possible, please, to buy a bottle from them to take home - they then proceeded to call the winery to see if that was ok and they said yes!! Thank you, thank you, that is kindness for you! (Sure made my year!) Visit their site to see their description: http://www.hestercreek.com/our_wines/wine.php?id=1004. Personally I think the finish exudes a touch of butterscotch, just enough to make you want to drink 6 bottles in a row!
  • Dirty Laundry - Riesling -- this is one of the most beautiful wineries I have ever seen! Summerland is a great place to spend some time. This riesling is nice and crisp and perfect chilled on a hot day. Check it out for yourself: http://www.dirtylaundry.ca/wine/riesling.php
  • Blasted Church - Pinot Gris -- you can get this one in Calgary!! Now, THAT is exciting! This unique winery is on the banks of gorgeous Skaha lake, and it makes me want to quit my dayjob, make and sell handycrafts for wine, and play tambourine in the sunset - seriously! http://www.blastedchurch.com/index.php?option=com_content&task=view&id=2&Itemid=10 I know they sell this wine at Centre Street North liquor store, Altadore liquor store and I'm sure many others. It's about $27 dollars and worth every last cent - just make sure you get your own bottle!

Happy sipping, slamming, chugging, or whatever it is you do!

Saturday 23 June 2007

Hot or not? All about chiles

While preparing for Jen and Garry's party tonight I wanted to catch up on my chile knowledge - check out this link:

http://www.foodsubs.com/Chilefre.html

This site is Cook's Thesaurus - my friend Michelle showed it to me about 5 years ago. As the title, Cook's Thesaurus would indicate, it provides substitutes for almost any ingredient you can think of. So next time you have a recipe that calls for something obscure or expensive, throw the term into the seach box - the results are even in alphabetical order (which pleases the librarian in me!).

Have a great weekend!

Friday 22 June 2007

Mini Fajitas

mmmm....Mexican food! Tomorrow night my best friend Jen and her husband Garry are having their post-wedding party. They married in Mexico a few months ago and are having a party here in Calgary. So, what a great opportunity to make some Mexican food (and of course, drink some rum!) Since the party is in the evening appetizers will be served rather than dinner. We have a really fun menu (which I can't wait to eat!):

  • Tomato based salsa, and pineapple salsa with chips
  • Chicken Mole with Kahlua and Pistachio (this is a neat dish: the chicken is cooked in Kahlua and the sauce is a savoury, spicy, chocolate sauce. The chicken will be skewered with the sauce on the side)
  • Layered bean dip
  • Veggies and dip - with a Mexican twist - colourful bell peppers, tomatoes, zucchinis, and mushrooms. A dip comprised of sour cream, mayo, cilantro, garlic, diced jalapeno, diced green onions - - and maybe more, this will be a dish with whatever looks fresh and whatever inspires.
  • And my favourite - Mini Fajitas:

  • Get a hunk of cheap beef, like chuck, and cook it in a crock pot until it is tender enough to fall apart, with some Mexican inspired flavours: you could use beef stock with store-bought taco seasoning, some people like to use things like Coke (which helps break down the connective tissues in the meat, making it tender), jalapenos or other chilies, chili powder, garlic, cilantro, onions, bell peppers, tomatoes, cumin, lime juice, the list goes on. You could do this the day before, that way you can give it a chance to cool and it will be easier to work with and also because it takes awhile to cook this, about 8 hours. The beef should shred easily when you take a fork to it.
  • Buy those "Scoops" chips, or cut out rounds or squares from tortillas and bake until they are toasted (you just want to give them some support to hold the beef, and also to not allow the beef to make your chips soggy), at 350º for about 5-6 mins, make sure to keep an eye on them.
  • Place a small pile of shreeded beef on the chip
  • Thinly slice onion and place a little on top of the beef
  • Thinly slice bell peppers and place on top
  • Shred some cheese and pile a little on top (whatever you like - there is a nice Mexican cheese called "Asadero". This is a smooth, yellow cheese with more "tang" than other milder melting cheeses. This cheese is ideal for baking because its stronger flavor adds to the appeal of a baked dish. http://www.specialcheese.com/queso.htm)
  • Bake in a 350° oven for about 8 mins, or until cheese is melted and meat is heated through.
  • Serve with salsa and/or hot sauce on the side.

For those of you in Calgary visit Boca Loca, located at 1512 - 11th Ave SW, they sell fine Mexican Foods. I'm not sure if they sell Asadero, put they do carry Manchego, a very popular Spanish cheese made with goat's milk. They also carry all sorts of fantastic chilies that are hard to find elsewhere and fresh tortillas. If anyone happens to know of another store or source for these ingredients, please share!

Sobey's also carries a great variety of chiles - I found Anaheim, Serrano and Poblano chiles there.

Enjoy! And have a great weekend - it's Willie Nelson tonight for me!!

Thursday 21 June 2007

Rice Vermicelli with Beef and Tomatoes

"What is a good first post?" This is what I have been thinking all morning. I have pages of ideas, but none of them seemed fit for this debut! So, what I want to know is, what do you want? What do you love to eat? What do you hate to cook? Any questions, I'll answer them, any suggestions, please share them.

Lately it's been all about tomatoes for me - they are, after all, my favourite food (you might have gleaned a hint of this from my blog picture!) They are so good for you too - they are high in antioxidants, they have been found to ward off certain types of cancer, and can apparently help maintain mental function as we age. Tomatoes taste fabulous when they are in season -- I like them straight up -- no salt and pepper, no balsamic, no salad dressing -- why mess with a good thing? Simple perfection is refreshing, just like a juicy tomato! Although there's nothing wrong with adding a little kick if you're in the mood. Last night we had my version of Bunh (Vietnamese dish with rice vermicelli) with tomatoes, beef and onions, let me share it with you:

Rice Vermicelli with Beef and Tomatoes

For 2 people:

  • 2 portions of beef (I used 2 eye of round steaks, very affordable), slice as thin as you can against the grain (so the meat is tender) -- if your knives are dull get yourself a sharpener, the wand type, it makes life much easier
  • 2 medium sized tomatoes, sliced thinly
  • 1 medium-large onion (I used yellow), cut in half, then sliced thinly
  • 2 tbsp olive oil (you can use canola, I just prefer olive)
  • Rice vermicelli

    Condiments:
  • Hoisin sauce (Available at supermarkets, I know Safeway has it, although you'll find it much cheaper at asian markets)
  • Hot sauce (Huy Fong Sriracha Hot Chili Sauce -- this is the stuff you see at most Vietnamese take out counters, they sell it at Superstore and other asian markets)

    Optional -- to make it pretty (spinkle on top):
  • chopped green onion
  • chopped peanuts
  • Heat olive oil in pan over med-high heat (make sure it's not too high - if you use olive oil you'll know it's too high when it smokes!)
  • Meanwhile, put water on to boil for the vermicelli
  • Add the beef and cook until it is almost done, then add the onions and a good dollop of hoisin.
  • Once the beef is cooked and the onions are tender, remove beef and onions from the pan and set aside
  • Add vermicelli to boiling water - I generally add the noodles, bring the water back up to a low boil, stir up the noodles and then turn the heat off, they just need to soak (or, just follow the directions on the package!). Drain in a colander when done.
  • Turn your pan to down to low
  • Lay the tomatoes in the pan, try not to let them overlap too much
  • After about a minute or less (you just want them to cook slightly) turn them quickly and remove the pan from the heat
  • Put the noodles in big bowls if you have them (like pasta bowls) and arrange the beef and onions, and the tomato on top.
  • Sprinkle the green onion and peanuts on top, if you have them
  • Serve with hoisin and hot sauce and people can add as they like.

    Enjoy!!